This job aid provides step-by-step instructions for completing a PeopleSoft journal to claim cash received.
Do not use this process to claim cash for gifts, sponsored research, or for payment of a department accounts receivable invoice; see Handling Cash and Checks and Accepting Electronic Funds Transfers (EFTs) for more information.
About Cash Journals (Source Code 320)
Journals to Claim Cash are Time Sensitive
- Departments should prepare and approve cash journals at least weekly.
- Payments deposited and received for the following month should not be processed until the period is open (e.g., deposits made, and payments received, between November 1-5 can be recorded when the November period is open.)
- Review the General Ledger Monthly Schedule (opens in new window), including month-end close deadlines, on the Controller's Office website.
The following tables provide a quick reference for seasoned Journal Preparers and Journal Approvers who are already familiar with all journal entry steps and mechanics and would like to review the specific requirements to enter a cash deposit journal (Source Code 320). Complete instructions on how to enter a cash deposit journal follow in the sections below.
Cash Journal Header Tab Requirements
| Guidelines | |
|---|---|
| Journal Header Description | Clearly state the purpose of the deposit, including whether the payment is for reimbursement, refund, or agency fund. Always include the cash receipt/deposit date. |
| Attachments |
Proof of transaction is required for journal approval. Besides the information required by the Controller’s Office, you can also attach documents for your own records.
ACH or Wire – Supporting documentation is obtained from the Controller's Office Unclaimed Payments List on UCSF Box.
Deposit or Lockbox - Acceptable documents include:
|
Cash Journal Lines Tab Debit and Credit Line Requirements
| Debit | Credit | |
|---|---|---|
| Account/Chartstring |
Enter relevant cash account:
|
Enter Department's relevant chartstring. |
| Amount |
|
One bank deposit may be split into multiple credit lines. |
| Reference |
|
Enter optional details relevant to the department. |
| Journal Line Description |
Journal Line Descriptions are used to match journals to bank data information during reconciliation.
|
|
Journal ID for Claiming Payment on Unclaimed Payments List
When preparing cash journals to claim payments from the Unclaimed Payments List, record the Journal ID number in the Journal ID for Claiming Payment column of the list. For procedures, see Identifying and Handling Unclaimed Payments.
Notes/Considerations: The Controller’s Office will review and reconcile posted cash and credit card journals on a weekly basis. Unreconciled journals will be flagged for additional review by Controller’s Office staff. Department Journal Preparers will be responsible for submitting any necessary journal corrections identified during the reconciliation process.
How to Log into PeopleSoft and Navigate to the Create/Update Journal Entries Page
- Log into MyAccess (opens in new window) (not shown). Scroll down to locate and select PeopleSoft Financials from the application menu. If you have set MyAccess to display "Favorites", you may need to change to "All Apps" or search for PeopleSoft.
- Click on the General Ledger tile, then on the Create/Update Journal Entries tile . The Create/Update Journal Entries page displays.

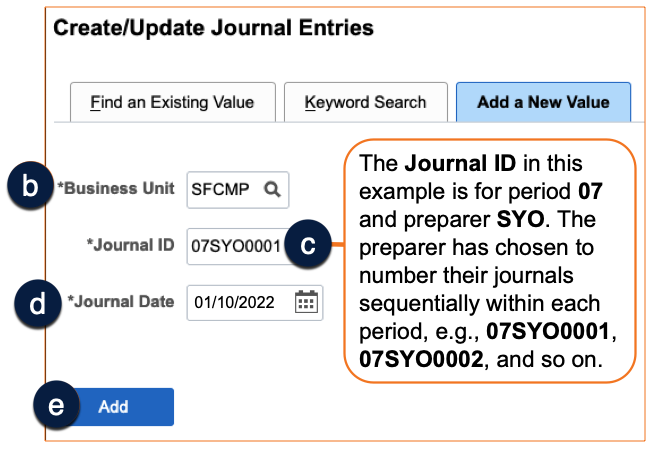
How to Begin a New Cash Journal
- Enter the correct Business Unit (defaults to the Business Unit set in your PeopleSoft System Profile) .
- Enter a Journal ID , using the UCSF preferred "XXABCYYYY" format, where:
- XX = the fiscal period of the journal (e.g., 01, 02, 03)
- ABC = your specific 3-character Journal Preparer ID
- YYYY = a sequential numbering scheme of your choosing
Overwriting the default of NEXT allows you to locate your entered journals on the Find an Existing Value tab. Using this preferred method, you can easily change the Journal ID search to contain your Journal Preparer ID ("ABC") to quickly find any journal you have created.
- Enter the correct Journal Date (defaults to current) .
- During the first five (5) business days of a month, you may enter dates in the previous month. Make sure to allow time for journal approval, ensuring the journal posts before month-end close.
- You may enter a date in a future period and save your journal, but you cannot edit or submit it until the period of the selected date opens.
- Click the Add button .
How to Prepare the Header Tab for a Cash Journal
On the Header tab enter the following information:
- Long Description (required) - Clearly state the purpose of the deposit, including whether the payment is for reimbursement, refund, or agency fund. Always include the cash receipt/deposit date .
- Source – enter 320 .
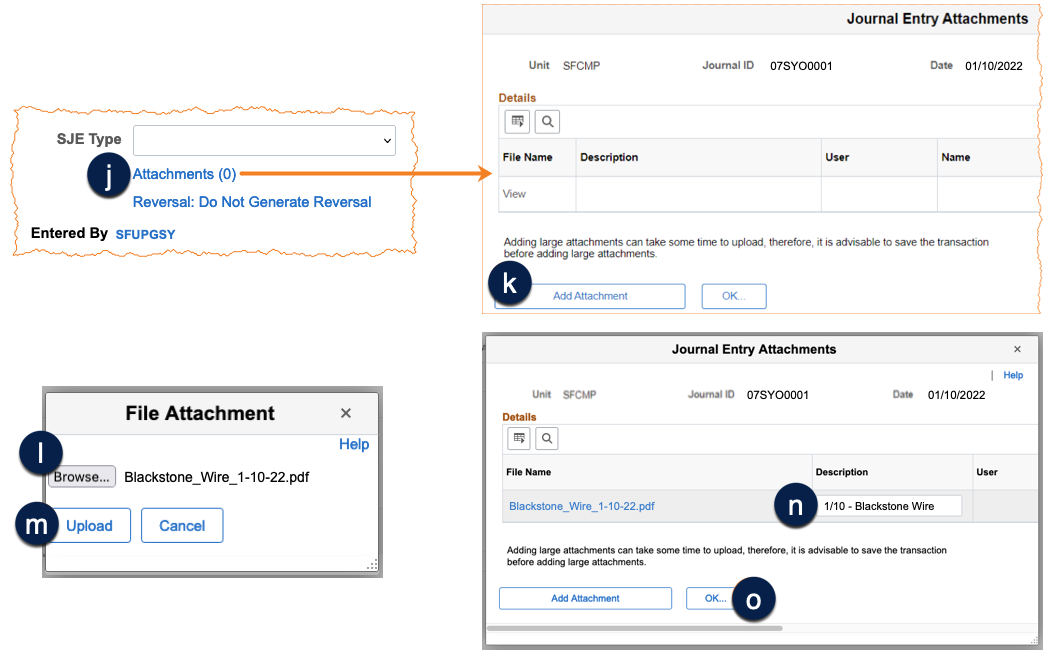
- Attachments – Proof of deposit is required for journal approval. Click to attach the required documentation to the journal , then follow the attachment instructions in the next section of this guide.
- Lines - Click the Lines tab to enter the financial information for the journal .

How to Attach Required Supporting Documentation on the Header Tab
Proof of deposit is required for journal approval. Besides the information required by the Controller’s Office, you can also attach documents for your own records. Redact any sensitive personal data in attachments.
- Click the Attachments (x) link from the journal header tab (x = the number of attachments that have been uploaded to this journal) to attach all supporting documentation .
- Click the Add Attachment button from the Journal Entry Attachments pop-up .
- Click the Choose File or Browse button (depending on browser configuration) from the File Attachment pop-up .
- (Not shown) Browse for the file you want to attach, select it, and click the Open button.
- Click the Upload button on the File Attachment pop-up .
- Enter a Description of the uploaded document (optional) .
- Repeat steps 2-6 for all other files to be attached, then click OK when done to return to the journal entry screen .
| ACH or Wire | Deposit Or Lockbox |
|---|---|
|
|
How to Enter Financial Information on the Lines Tab
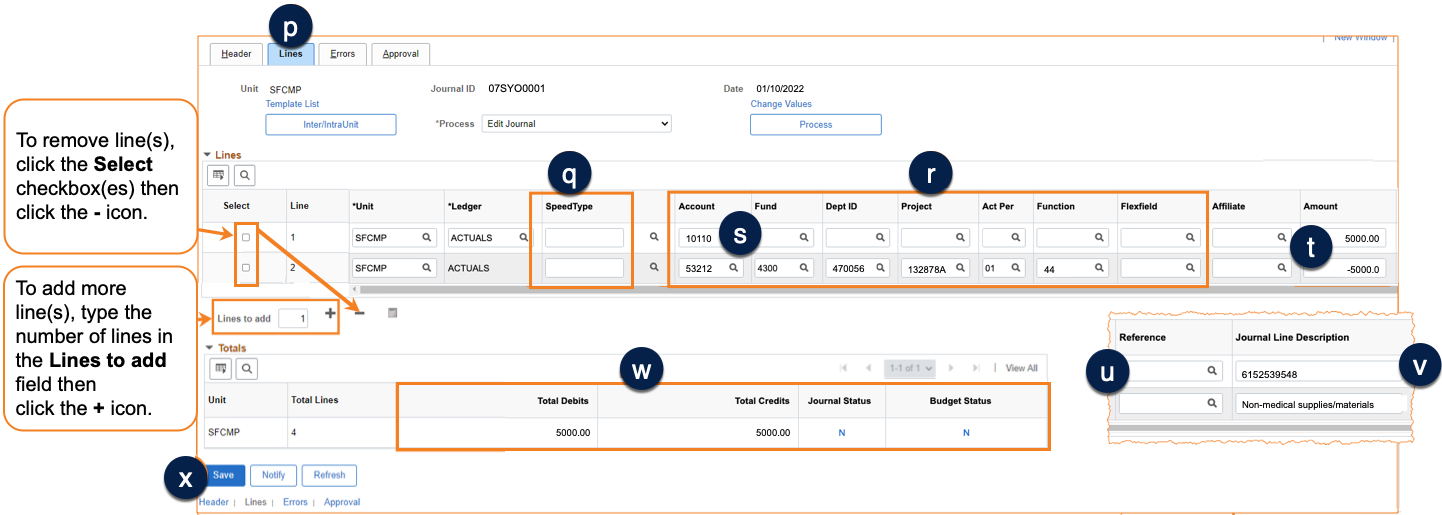
- Click on the Lines tab to enter the financial information on the journal .
- For debit lines (positive Amount), enter the appropriate bank account .
- For credit lines, enter the appropriate chartstrings: Business Unit / Account / Fund / Dept ID / Project / Act Period / Function / Flexfield
- Enter the SpeedType (if applicable) , OR
- Enter your department's relevant chartstring information .
- Enter the Amount for each line . (see instructions in the screenshot captions for adding additional lines)
- Enter only one debit line for each bank deposit amount, which should match the bank amount. Bank amounts should not be split. Bank amounts should never be combined on one line.
- You may enter multiple credit lines to distribute the deposit.
- Scroll over to the far right of the screen, where you will find the Reference field for each journal line .
- For ACH and Wire - leave this field blank.
- For Deposits - enter the deposit location number (found on deposit slip, usually 4 digits).
- For Lockbox - enter the lockbox location number.
- In the Journal Line Description field for the debit line:
- Enter the Bank Reference Number (from the Controller's Office Unclaimed Payments List.)
- You can copy the Bank Reference Number from the Unclaimed Payments List and paste it into the Journal Line Description field.
- Do not enter any additional characters or spaces.
- Enter the Bank Reference Number (from the Controller's Office Unclaimed Payments List.)
- After entering all lines, Total Debits must equal Total Credits and the Journal Status should be N (not edited) . If not, the mismatch must be corrected.
- Save the journal before moving on to the next step .
How to Edit a Cash Journal
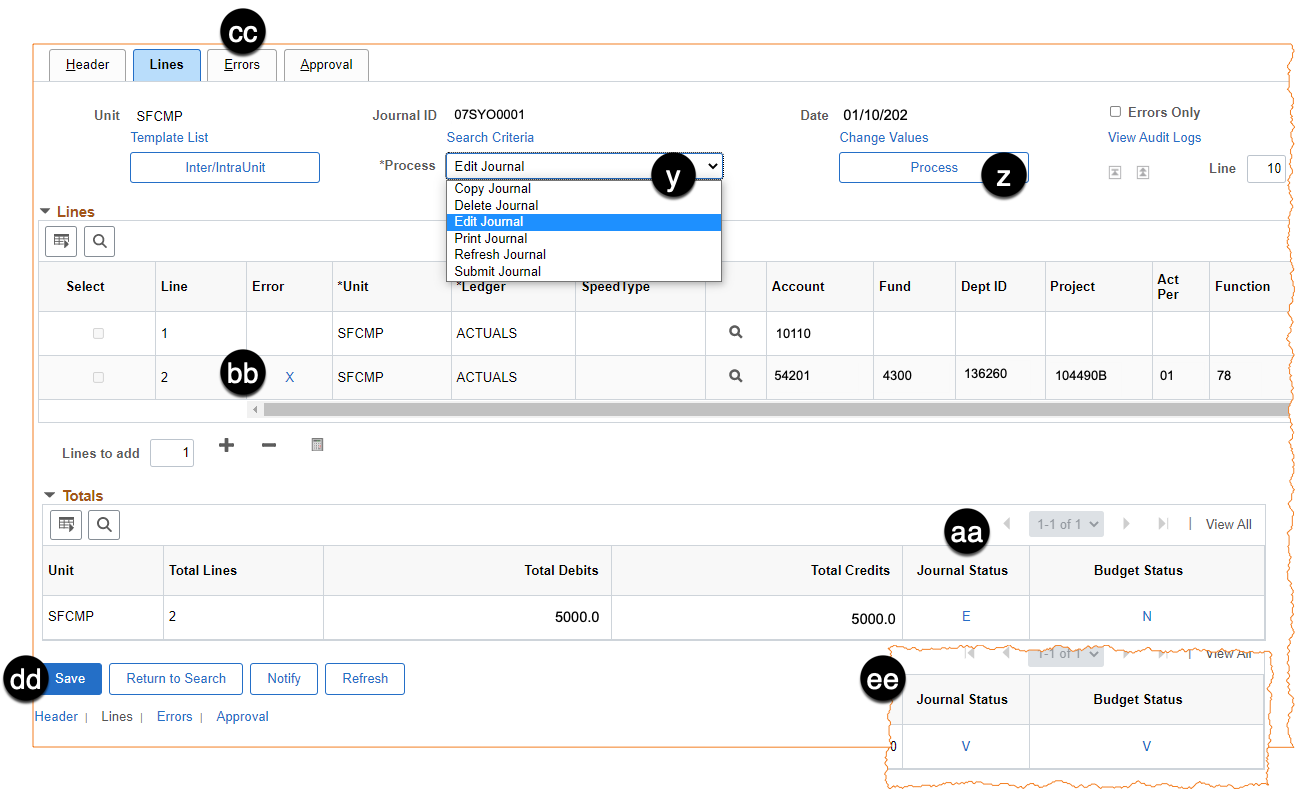
- All chartfield combinations are valid
- The journal date is in an open period
- Total Debits equal Total Credits
- Click the Process drop-down menu and select Edit Journal .
- Click the Process button and wait until the edit process completes .
- If there are errors, the Journal Status will display “E” () and the lines in error will be marked with an “X” ().
- If you have an error status but no lines are marked in error, this is most likely because Total Debits do not equal Total Credits, or because the Journal Date is in a closed period.
- For lines marked with “X”, go to the Errors tab to review the error description . Refer to the Combo Edit Quick Reference Guide (opens in new window) for more information regarding valid chartfield combinations.
- When the errors are corrected, click the Save button .
- Re-run the Edit Journal process by repeating steps 1-2.
- When the Edit Process is successful and there are no errors, Journal Status is set to V (Valid), and the journal can now be submitted for approval .
How to Submit a Cash Journal for Approval and Monitor Approval Status
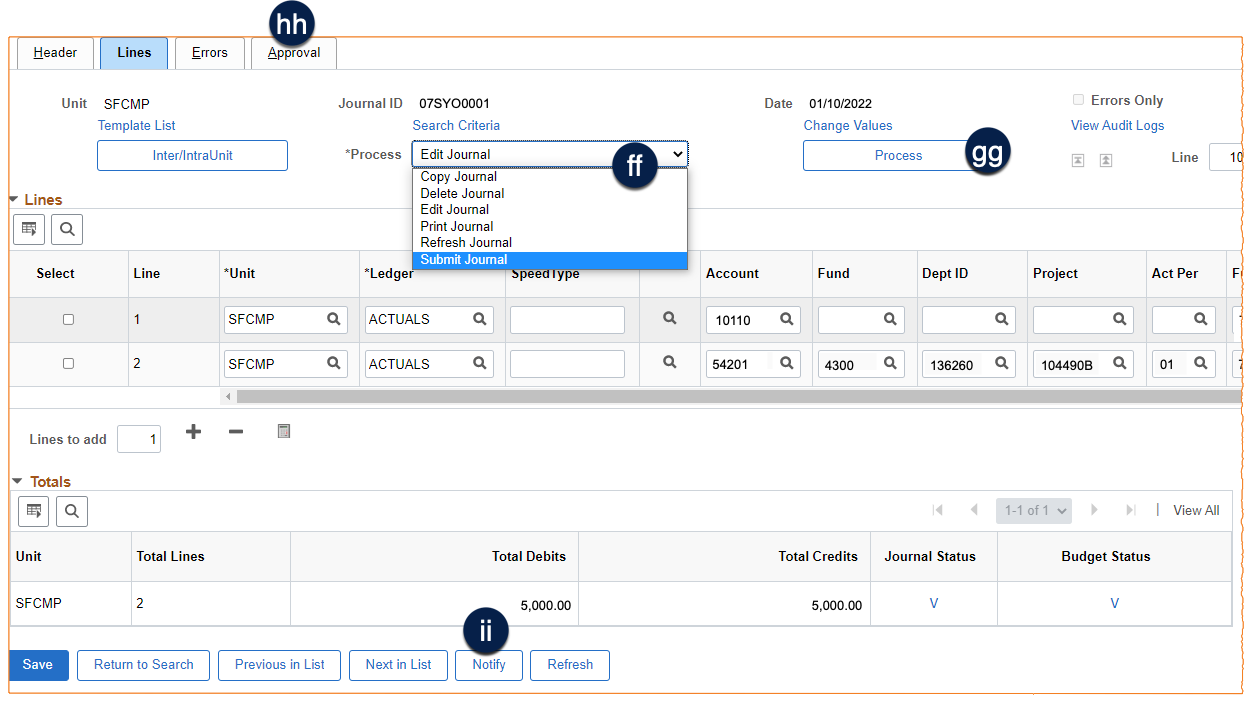
- Change the Process drop-down menu to Submit Journal .
- Click the Process button .
- Click on the Approval tab to view the Approval Status and list of approvers . The journal will be in the first approver’s Worklist until action is taken.
- Click the Notify button at the bottom of the page if you wish to notify the Approver via email .
- Return to the Approval tab at any time in the journal cycle to see the current step of the approval process .