MyFavorites functionality allows MyReports users to save and retrieve commonly used filter criteria. A selection of MyFavorites can then be used to schedule reports with MySchedules. Scheduled reports send email with the attached report(s) to identified recipients. This step-by-step guide explains how to create and manage MyFavorites and how to use MyFavorites to create and maintain MySchedules.
Saving a New MyFavorite
MyFavorites can be created for most reports. To set up a new MyFavorite, log into MyReports and navigate to the report’s filter page. Enter the desired report filters first, and then:
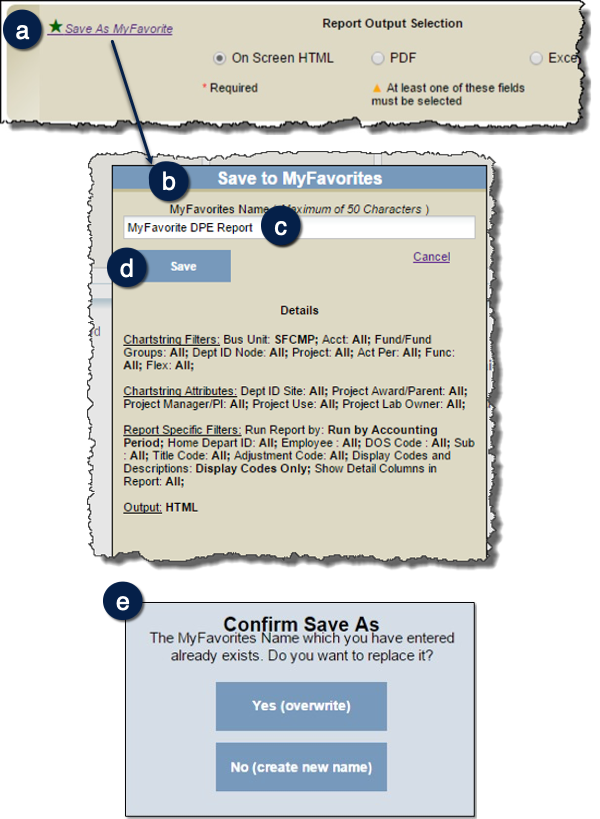
- Click the Save as MyFavorite link located at the bottom left-hand corner of the Report Output Selection . The Save to MyFavorites pop-up displays .
- Enter a MyFavorites Name with a maximum of 50 characters .
- Click the Save button .
- When a MyFavorite is recalled, the current default date filters established for the report are applied. Date criteria entered at setup are not retained.
- MyFavorites are case-sensitive and cannot be overwritten without confirmation. You will receive a pop-up message if you attempt to save using an established MyFavorite : Click Yes to overwrite, or No to change the name.
- MyFavorites is not available for the Accounts Payable/Purchase Order Inquiry Report and the Employee Lookup Report.

Using Saved MyFavorites to Load Filter Settings (Recalling a MyFavorite)
- Navigate to the desired report filter page (not shown).
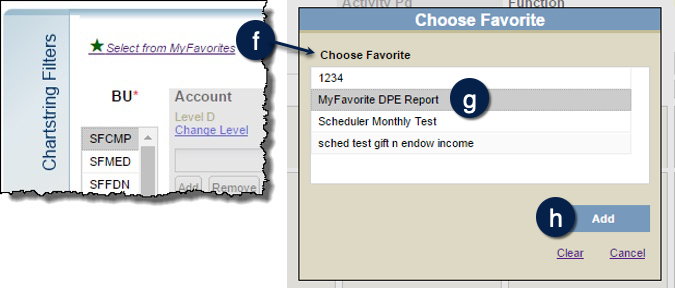
- Click the Select from MyFavorites link in the Chartstring Filters section . The Choose Favorite pop-up displays.
- Select the desired MyFavorite from the list .
- Click the Add button .
- Enter the desired date filters, adjust or add additional filters if necessary, and then run the report to your desired report output format (not shown).

Managing MyFavorites
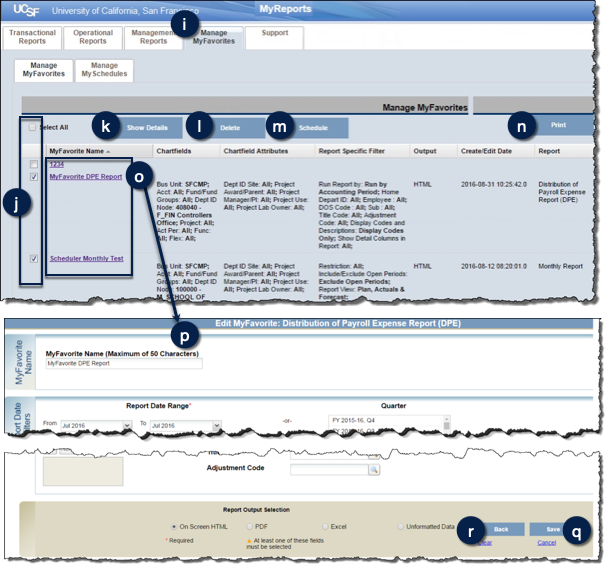
- Click the Manage MyFavorites tab .
- Select appropriate MyFavorite(s) or all using the checkbox(es) , then choose the action;
- To display entered filter settings, report creation/edit date, and report, click the Show Details button. To hide the details, click the Hide Details button .
- To delete selection(s): Click the Delete button then click Yes to confirm or No to cancel .
- To add selection(s) to a new Schedule: Click Schedule (see scheduling instructions in the Scheduling a Report Run Using MySchedules section below.)
- To open a ready-to-print list containing the names of the selected MyFavorites in a new window, click Print . Details will also be included when Show Details has been revealed as in above. Please consider our environment before printing.
- To Edit or change the name of a MyFavorite: Click the MyFavorite Name . The Edit MyFavorite page displays in a new tab/window .
- Make the desired changes to the MyFavorite name and/or filter settings. (Note: Though date filters are visible, they are not saved as a part of the MyFavorite; current dates are loaded when the MyFavorite is recalled).
- Click the Save button on the bottom right .
- Click Back , or close the browser window/tab, to return to Manage MyFavorites (changes will not be saved if you do not click the Save button before you go back).

MyFavorites Tips and Tricks
- Use MyFavorites for frequently used or complex filter combinations.
- Save the smallest possible list of filter criteria to your MyFavorite and add or adjust filters at runtime.
- MyFavorites are saved for individual users and are not shared.
- After editing a MyFavorite, you must refresh your browser on the Manage MyFavorites tab (F5 key on PCs or Command+R on Macs) for changes to display.
- Date filters are not saved as part of the MyFavorite and each report will reset to the most current default date parameters when recalled.
- MyFavorites used on a MySchedule will run using the most current date parameters unless the timing is set to run at month-end close.
Scheduling a Report Run Using MySchedules
Select MyFavorite(s) to schedule:
- Click on the Manage MyFavorites tab (not shown).
- Click the checkbox(es) to select one or more MyFavorite(s) to schedule. Even though multiple reports can be added to the same schedule, each report will be delivered via a separate email. You can also add or remove MyFavorites for scheduling in a future step before saving your schedule .
- Click the Schedule button. The Schedule Wizard displays. Selected MyFavorites are displayed in the Selected Reports section .
- To remove a report(s), click to select (CTRL or Command + click for multiple) and then click the << icon .
- To add a MyFavorite not selected in step :
- Click on the MyFavorites folder to display all MyFavorites available for scheduling in Available Reports .
- Select a report or reports using the mouse, then click the >> icon to move to Selected Reports .
- When finished selecting reports, click the Next button, or click on the Timing tab, to set the schedule .
Set up MySchedule Timing:
-
Choose the radio button of the desired Type of schedule :
| Type | Report Schedule to Run… |
|---|---|
| Once | One time only on designated date |
| Weekly | Weekly based on interval and day of week until deleted or designated end date |
| Monthly | Monthly based on interval, or once per month at month-end close, until deleted or designated end date |
| Yearly | Once each year on set date until deleted or designated end date |
- Set the timing using the following guidelines based on your timing Type selection. All schedules run after the nightly load for the selected day has completed :
| Type | Settings and Guidelines |
|---|---|
| Once |
|
| Weekly |
|
| Monthly |
|
| Yearly |
|
- Click Next, or click on the Email tab, to continue and set up the report delivery options .
Set up MySchedule Email options:
- Add the UCSF Email addresses for report delivery in the To: field separated by commas or semicolons (, or ;). Do not enter any spaces after the commas or semicolons (e.g. [email protected],[email protected]). By default, you will receive a Cc: (Carbon copy) of all scheduled reports you create when they run. If you are the only intended recipient you must also enter your own email address in the To: field .
- The Subject line defaults to “MyReports: delivery of scheduled reports”. You should change the subject to be meaningful to the recipient(s) .
- Body is blank by default. Add an optional message here. Your message will be inserted into the email prior to the default text from the scheduling engine .
- The message in the "This message will appear in all emails" section is inserted into all scheduled emails by MyReports, and cannot be edited. It includes language that identifies you as the schedule owner, as well as the schedule name and the selected MyFavorites you used to create the schedule .
- Choose one of the Available Attachments - PDF, Excel (default), or Unformatted Data .
- (Optional) If you have need to reduce the physical size of the attachment, select the Send report outputs in zip file checkbox to send a compressed .zip file of the selected output. This option does not compress all scheduled reports into one zip file. The recipients still receive a single email for each report, however each report output (PDF, Excel, or Unformatted Data) will be sent compressed inside a .zip file extension instead of .pdf or .xlsx .
- The report output format saved in the MyFavorite is not automatically applied to scheduled reports
- Note that when a report is included in a schedule where Unformatted Data is selected but does not contain an unformatted data output, that report will be delivered in the report default Excel format.
- Click Save to save your new MySchedule. A confirmation window displays .
- Click OK to dismiss the message .

Managing MySchedules

Saved MySchedules can be edited, paused, resumed, deleted, or printed:
- Click on the Manage MyFavorites tab .
- Click on the Manage MySchedules sub-tab .
- To Edit an existing schedule, click the Schedule Name. The Schedule Wizard displays. Make any necessary edits and click save .
- To Pause, Resume, Delete, or Print:
- Select the desired MySchedule(s) using the checkbox(es) .
- Click Pause to pause schedules in Normal status. This stops the schedule from operating temporarily until you Resume the schedule .
- Click Resume to resume schedules in Paused status. They will return to normal operation .
- Click Delete to delete, and then OK to confirm, or click Cancel to return to Manage MySchedules .
- Click Print to print the details displayed on your screen about the selected MySchedule(s) .
- To see any changes you have made, click the Refresh button .
MySchedules Tips and Tricks
- MySchedules are specific to the schedule creator and are not shared.
- You may send reports to UCSF email addresses only.
- Only one output format can be selected for a group of scheduled reports. Create separate schedules for reports requiring differing output formats.
- One report is sent per email. Multiple reports are sent attached to individual emails when grouped as one schedule.
- MyFavorites and MySchedules are not available for the Accounts Payable/Purchase Order or Employee Lookup reports.
- The Project Comparison report cannot currently be scheduled.
- You cannot sort or drill in scheduled report outputs. Run the report on-demand to on-screen HTML to sort or drill.
- When a schedule is set to unformatted data, and unformatted data is not available in an associated report, a formatted Excel file is delivered.
- All scheduled reports run with current default date parameters except “at campus month-end close”.
- Schedules run and are delivered in the order they are queued after all nightly system operations. You cannot schedule a specific run time. You can expect month-end reports to arrive the day after the scheduled campus GL close date. Because month-end data processing takes longer, your reports may arrive later than expected.
- There is no need to retain files sent by the scheduler. We suggest you review them on-screen to save paper, then delete or archive the emails. The same reports can be run again, on-demand in MyReports by selecting the appropriate filters and date parameters.
- Deleted MyFavorites are also removed from related MySchedules.
Additional Information and Assistance
- More information about MyReports, including how to request access and additional training, can be found in the MyReports section of the Controller’s Office website.
- If you require help with a technical problem or have a question about a specific report, contact the Controller’s Office Solution Center at [email protected] or 415.476.2126.
- To stay informed about MyReports news, follow the directions on the MyReports section of the Controller’s Office website to join the MyReports ListServ.
