This guide provides an overview of submitting Time Off Requests.
Step-by-step instructions include how to:
- Submit time off requests from the My Time Off tile: biweekly employees
- Submit time off requests from the My Time Off tile: monthly employees
- Select time off date ranges that include a weekend or holiday
- Submit time off requests from My Calendar
- Enter time off directly in the timecard
Submitting Time off Requests from the My Time Off Tile: Biweekly Employees
- From the Home Page, find the My Time Off tile.
- Choose the type of accrued time you would like to deduct from as your Reason.
- Choose one or more Dates. Only select the dates you will be absent from work. See below for tips on selecting date ranges that include a weekend or holiday.
- In the Duration field, select Hours.
- Enter a specific number of hours using the Start Time and End Time.
| Biweekly Exempt Employees | Biweekly Non-Exempt Employees |
|---|---|
|
For full day time off requests, enter the start and end time of your scheduled shift hours as reflected in MyTime. Examples:
|
Enter a start and end time that reflects the total number of work hours you are taking off, excluding unpaid meal breaks. Example: If you work 8 hrs/day and are normally scheduled to work 8 a.m. – 4:30 p.m. with a 30-minute meal break, then enter 8 a.m. as the Start Time and 4 p.m. as the End Time. Note: This entry will not align with your scheduled shift and will create an exception error that can be adjusted by your scheduler or manager. |
- Optional: Choose Sync with My Calendar to add the time off request to your personal calendar such as Outlook.
- Optional: Choose Advanced Options to open the Request time off Slider.
- Choose Submit. The My Time Off tile will inform you that your request was successfully submitted. Your request is routed to your manager (or their delegate) for approval.

Submitting Time off Requests from the My Time Off Tile: Monthly Employees
- From the Home Page, find the My Time Off Tile.
- Choose the type of accrued time you would like to deduct from as your Reason.
- Choose one or more Dates. Only select the dates you will be absent from work. See below for tips on selecting date ranges that include a weekend or holiday.
- In the Duration field, select Hours.
- For full days off, enter the start of your regular workday in the Start Time field.
- Enter the Duration Hours. This is the daily hours, if you are selecting multiple days off you will still only enter the daily total hours being taken each day.
Note: The University will record vacation, paid time off (PTO), and sick leave used by exempt employees in full day increments, or in increments not less than that portion of the day during which an employee on less than full-time pay status is normally scheduled to work. The foregoing does not apply when an employee is taking FML on an intermittent or reduced schedule basis. For more information, see Vacation, Sick and PTO on the UCSF Human Resources website. - Optional: Choose Sync with My Calendar to add the time off request to your personal calendar such as Outlook.
- Optional: Choose Advanced Options to open the Request time off Slider.
- Choose Submit. The My Time Off tile will inform you that your request was successfully submitted. Your request is routed to your manager (or their delegate) for approval.

Selecting Time Off Date Ranges that Include a Weekend or Holiday
When submitting time off requests, employees should select only days from their established work schedule. When selecting consecutive days off that span a weekend, or other non-workdays like holidays, be sure that your date selections exclude these days.
Non-consecutive dates and date ranges can be submitted in the same time off request.
- Click Advanced Options on the My Time Off tile.
- Choose the type of accrued time you would like to deduct from as the Request type.
- Select the start and end date range only selecting the dates you will be absent from work.
Option One: Select Dates from the Calendar.
- Choose the calendar icon to select all workdays. In the example provided, the time off request is for the period June 9 through June 20. This date range includes two weekends and a holiday.
- Start by selecting dates in the first work week. Then select days in the second work week. Do not include the weekend in between or the holiday on June 19. Holidays display with a flag.
- Click Done.
Option Two: Select Multiple Date Ranges.
- Enter the Start Date and End Date of the first segment of workdays for your time off request (or, use the calendar icon to select the date range of the first segment). Do not include weekends or the holidays.
- Choose Add another date and enter the next Start Date and End Date of the next segment of workdays.
- Continue as needed until all segments are entered.
- The main screen will display all dates in your time off request, segmented to include only the work days you are requesting off.
- Click Next.
- Continue completing your time off request following the steps above for biweekly or monthly employees.

Submitting Time off Requests from My Calendar
As an alternative to using the My Time Off tile on your homepage, you can request time off directly from your schedule.
- From the Home Page, select the Main Menu in the top left of the screen. This opens the Main Menu on the left-hand side of the screen.
- Expand the My Information section of the Main Menu. Select My Calendar.
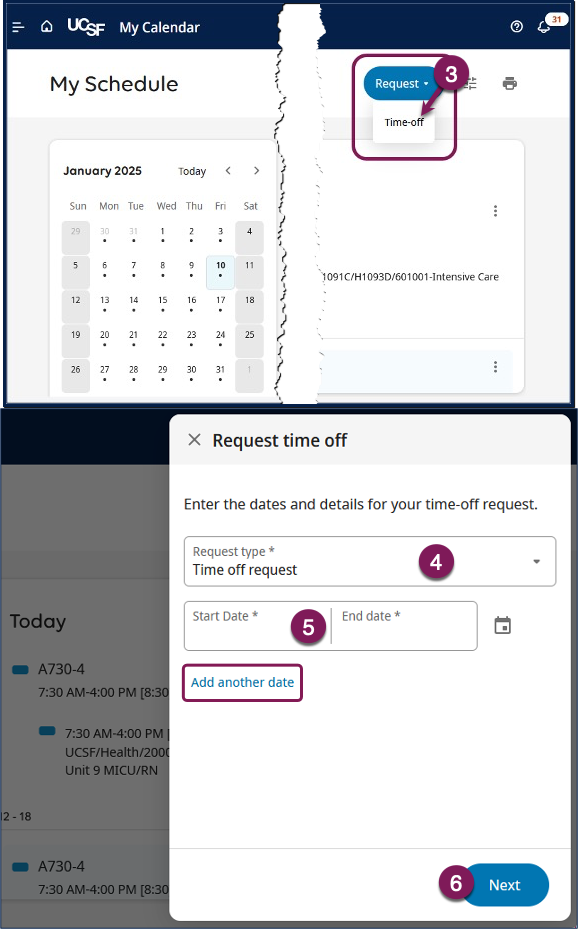
- On the top right of the screen, select the Request button, then Time Off.
- This opens the Request time off slider. Choose the Request Type for your time off request (e.g. Time Off Request, Vacation).
- Choose the date or dates you would like to request by using the Start Date and End Date. Use the Add Another Date option to add more than one set of dates. Only select the dates you will be absent from work. See above for tips on selecting date ranges that include a weekend or holiday.
- Click the Next button to move to the next screen.
- Continue completing your time off request following the steps above for biweekly or monthly employees.
Enter Time Off Directly in the Timecard
While biweekly employees will notice slight differences in the display of their timecards from the images presented below, the steps are the same for applying time off directly to both biweekly and monthly timecards.
- On the Home page, select the Main Menu in the top left of the screen. This opens the Main Menu on the left-hand side of the screen.
- Expand the My Information section of the Main Menu. Select My Timecard. If necessary, navigate to the week you need to add time off to using the previous and next buttons.
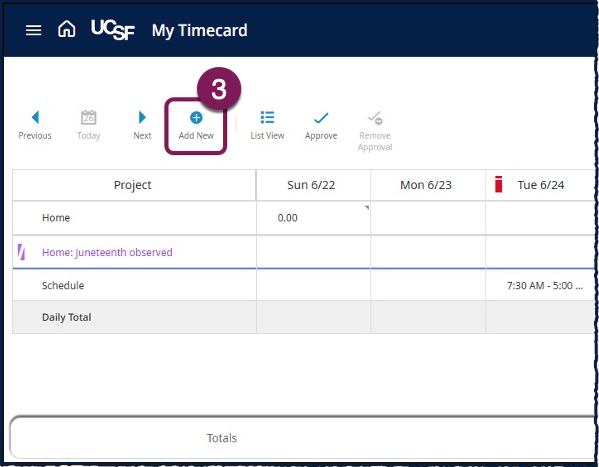
- From the Action Bar at the top left of the screen, select the Add New button.
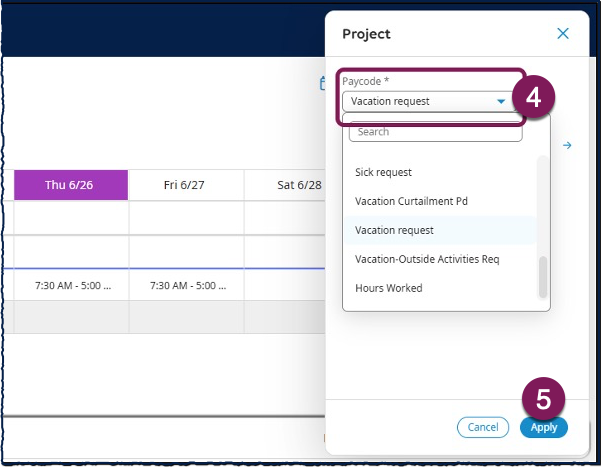
- Select the appropriate Paycode from the drop-down list. Note that the Paycodes for Vacation and Sick time are followed by the word “request”. These are the correct Paycodes to use when adding Vacation and Sick time directly to your timecard.
- Select Apply.
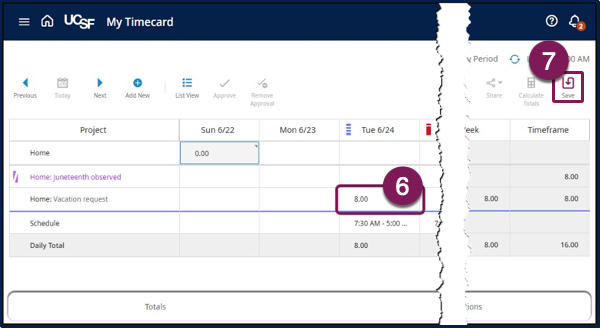
- A new row is added to the timecard for each Paycode you selected. On the new row(s), locate and click the day of the week of your time off and enter the number of hours you used. Repeat steps 3-6 if you need to add additional Paycodes for the pay period.
Tip: If you have previously requested leave during the month using one of the time off request methods and it was approved by your manager, you will see a Paycode and hours in purple text for that request. You will not be able to enter or change those rows as they are flowing over from your schedule. You can cancel an approved requested leave or make changes to a requested, but not yet approved leave, from your schedule. For more information see View and Manage My Schedule.
- Select Save.