This guide outlines the steps to prepare a non-payroll accrual entry, which may be required under Final Financial Reporting, Invoicing and Closeout of Sponsored Awards (opens in new window).
Carefully review Accruals for Financial Reporting, Invoicing and Closeout of Sponsored Awards (opens in new window) for all guidelines on the purpose and process for preparing and reversing a non-payroll accrual entry. For expenses that have not yet been posted to the General Ledger, the RSA or other department delegate can process an accrual entry and request approval by the department Journal Approver and Contracts and Accounting (CGA) Analyst. If approved, the accrual will be posted to accurately report expenses to the sponsor.
How to Log into PeopleSoft and Navigate to the Create/Update Journal Entries Page
- Log into MyAccess (opens in new window) (not shown). Scroll down to locate and select PeopleSoft Financials from the application menu. If you have set MyAccess to display "Favorites", you may need to change to "All Apps" or search for PeopleSoft.
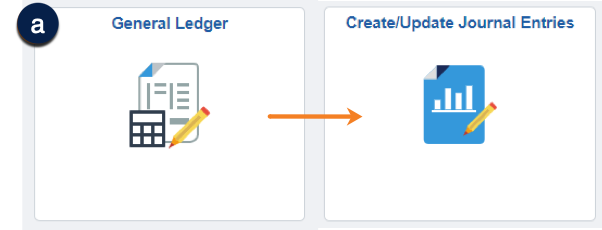
- Click the General Ledger tile, then the Create/Update Journal Entries tile . The Create/Update Journal Entries page displays.
How to Begin a New Non-Payroll Accrual Journal in PeopleSoft
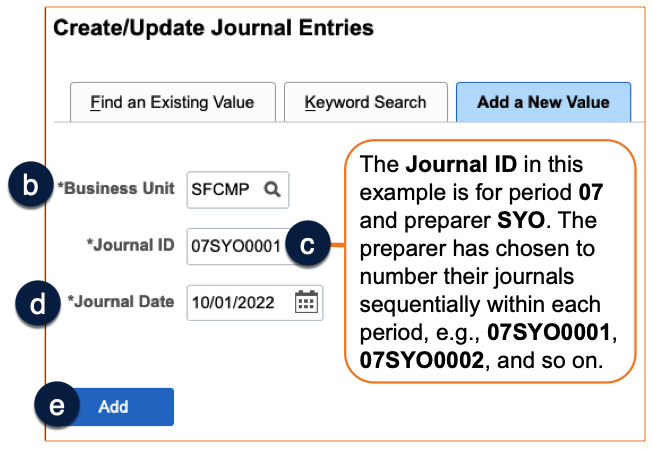
- Enter the correct Business Unit (defaults to the Business Unit set in your PeopleSoft System Profile) .
- Enter a Journal ID , using the UCSF preferred "XXABCYYYY" format, where:
- XX = the fiscal period of the journal (e.g., 01, 02, 03)
- ABC = your specific 3-character Journal Preparer ID
- YYYY = a sequential numbering scheme of your choosing
Overwriting the default of NEXT allows you to locate your entered journals on the Find an Existing Value tab. Using this preferred method, you can easily change the Journal ID search to contain your Journal Preparer ID ("ABC") to quickly find any journal you have created.
- Enter the correct Journal Date (defaults to current) .
- During the first five (5) business days of a month, you may enter dates in the previous month. Make sure to allow time for journal approval, ensuring the journal posts before month-end close.
- You may enter a date in a future period and save your journal, but you cannot edit or submit it until the period of the selected date opens.
- Click the Add button .
How to Prepare the Header Tab for a Non-Payroll Accrual Journal
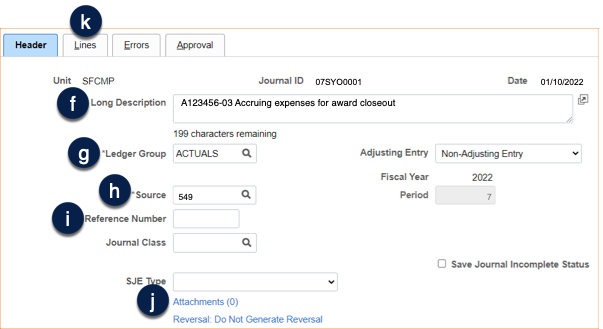
On the Header tab enter the following information:
- Long Description (required) - Enter the Award Number/Activity Period and describe the accrual transaction .
- Ledger Group – should be ACTUALS .
- Source - enter 549 –
- Note that the UCSF Attachment E tab will not appear until you enter Source code 549 and navigate to the Lines tab.
- Reference Number - (optional) 8-character field .
- Attachments – Click to attach documents as necessary to support the nature and amounts of the journal , then follow the attachment instructions in the next section of this guide.
- Lines - Click the Lines tab to enter the financial information for the journal .
How to Attach Supporting Documentation on the Header Tab
Attachments that substantiate your journal entry are required for timely approval. Examples include emails/invoice estimates from subrecipients, and outstanding purchase orders within BearBuy.
- Click the Attachments (x) link from the journal header tab (x = the number of attachments that have been uploaded to this journal) to attach all supporting documentation that corroborates the journal .
- Click the Add Attachment button from the Journal Entry Attachments pop-up .
- Click the Choose File or Browse button (depending on browser configuration) from the File Attachment pop-up .
- Browse for the file you want to attach, select it, and click the Open button. (not shown)
- Click the Upload button on the File Attachment pop-up .
- Enter a Description of the uploaded document (optional) .
- Repeat steps 2-6 for all other files to be attached, then click OK when done to return to the journal entry screen .

How to Complete the Lines Tab for Non-Payroll Accrual Journals
Complete the financial information on the Lines tab of the journal:
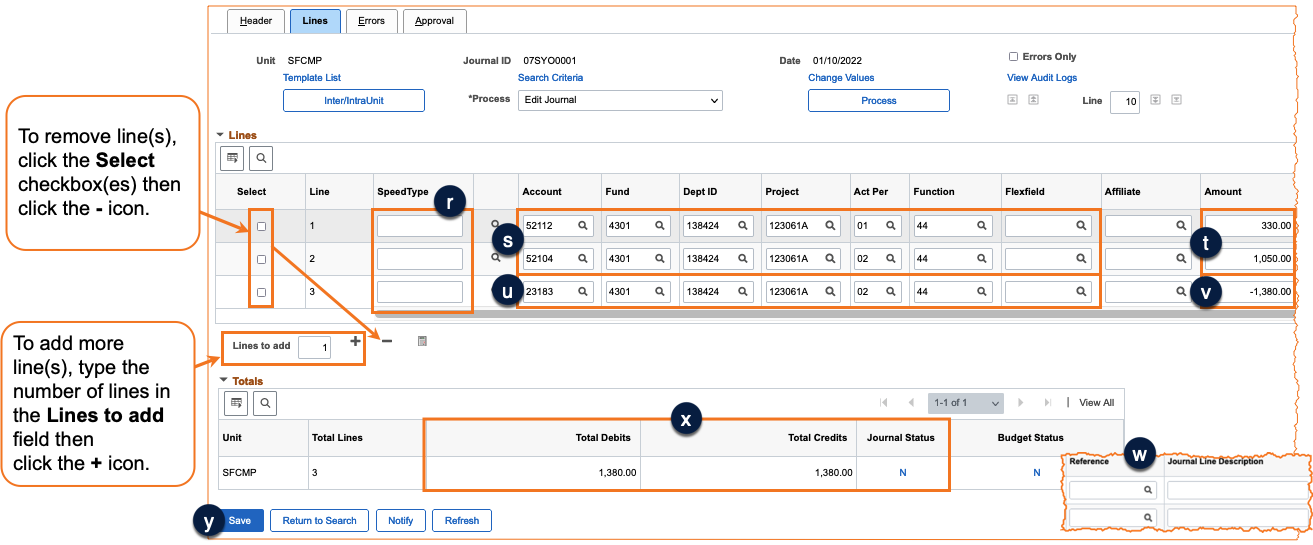
- For the debit (positive number) lines, enter the award chartstring information: Business Unit / Account / Fund / Dept ID / Project / Act Period / Function / Flexfield
- Enter the SpeedType (if applicable) , OR
- Enter the appropriate Chartstring information .
- Enter the debit Amount (positive number) for each debit line entered . (see instructions in the screenshot captions for adding additional lines)
- Enter the direct cost ONLY, (e.g., 330.00, 1,050.00); the system will automatically calculate and post the corresponding indirect cost
- Reminder: Do not use this guide to prepare payroll accrual journals; see Accruals for Financial Reporting, Invoicing and Closeout of Sponsored Awards (opens in new window) for further instructions.
- Enter the accrued liability chartstring on a new line :
- Account for the accrued liability line should always be: 23183 (OCL-spon rsch nonpay accrual)
- The remaining chartfields for this line should be the same as the sponsored award entered in step 1
- Amount is the credit line (negative number), and should be the sum of all entered debit lines, (e.g., -1,380.00)
- Scroll over to the far right of the screen, where you can enter data in two optional fields :
- Reference is an 8-character field. If your journal line is correcting a previous journal entry, enter the original Journal ID.
- Journal Line Description is a 30-character field where you may override the default Account description in order to provide a description of this transaction which will display on the Transaction Detail Report (opens in new window) in MyReports.
- After entering all lines, Total Debits
must equal Total Credits and the Journal Status should be N (not edited) . If not, the mismatch must be corrected. - Save the journal before moving on to the next step .
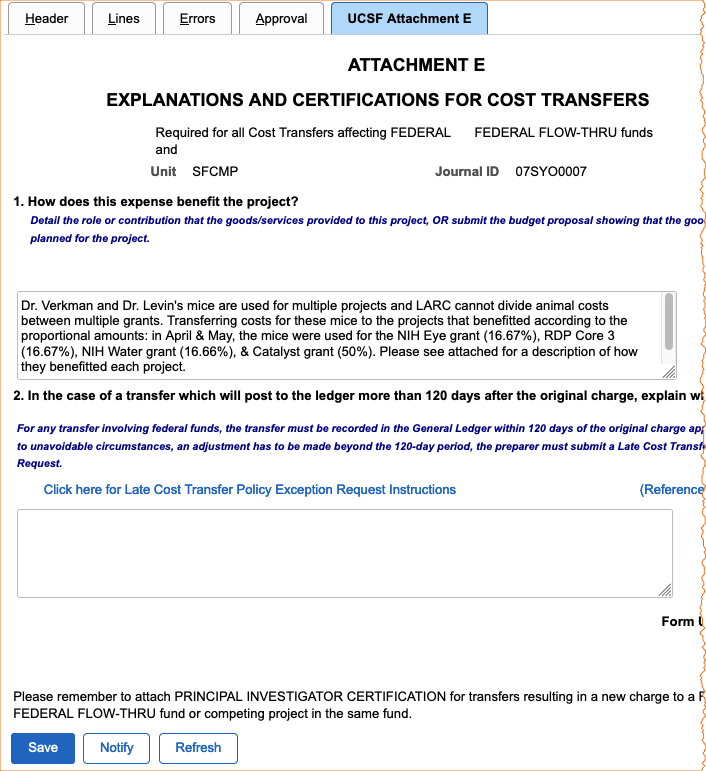
How to Complete UCSF Attachment E
Attachment E must always be completed for federal or federal flow-through Award Projects. Click the UCSF Attachment E tab, and complete as follows:
- For journals within 120 days of the original charges, complete question 1 only
- For journals more than 120 days after original charges, complete both questions
How to Edit a Non-Payroll Accrual Journal
The Edit Journal process must be run prior to submitting any journal, and ensures that:
- All chartfield combinations are valid
- The journal date is in an open period
- Total Debits equal Total Credits
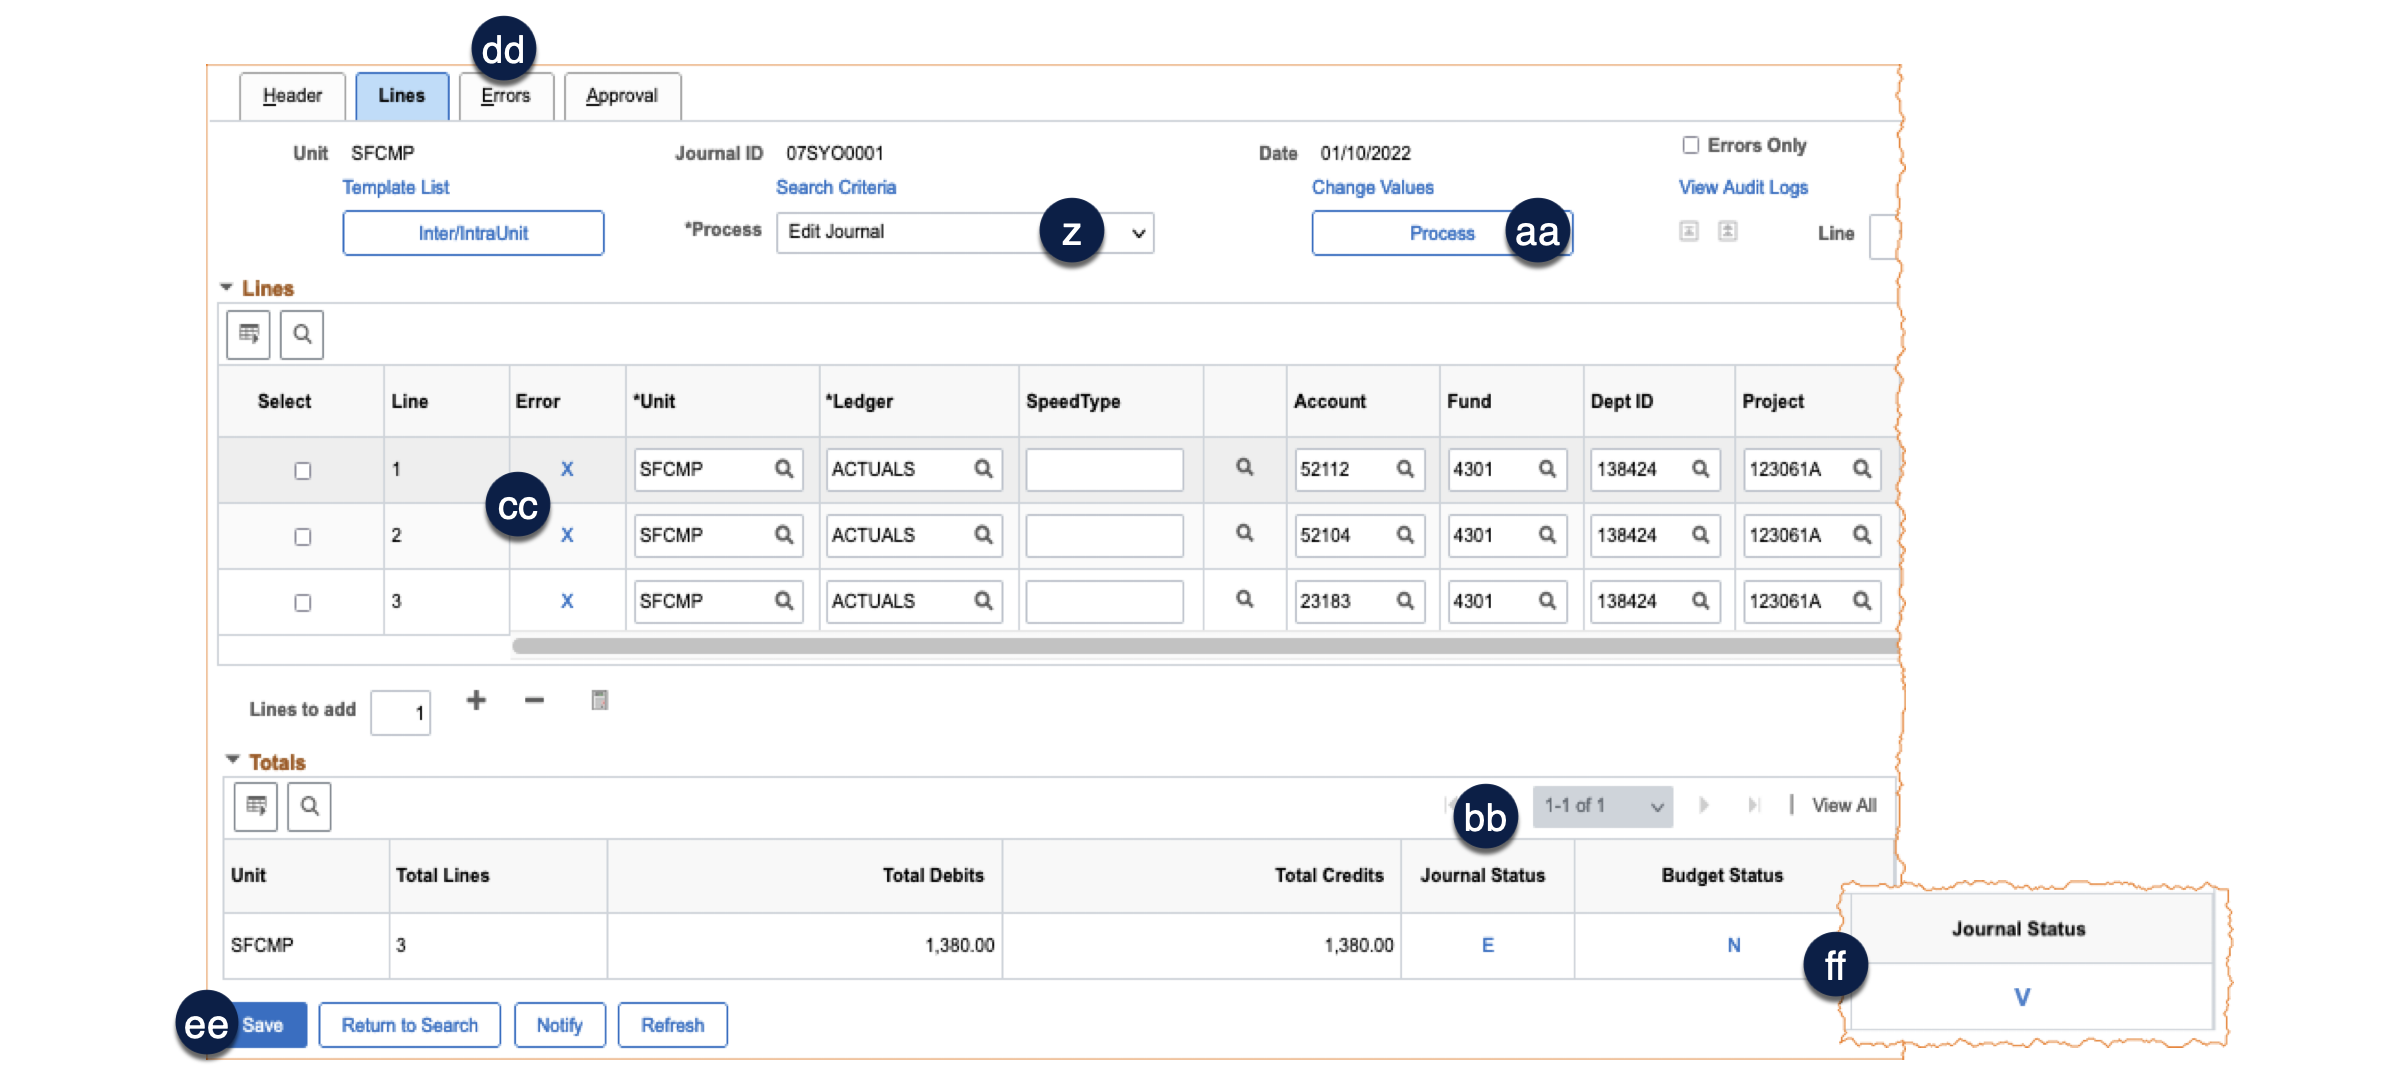
- Click the Process drop-down menu and select Edit Journal .
- Click the Process button and wait until the edit process completes .
- If there are errors, the Journal Status will display “E” () and the lines in error will be marked with an “X” ().
- If you have an error status but no lines are marked in error, this is most likely because Total Debits do not equal Total Credits, or because the Journal Date is in a closed period.
- For lines marked with “X”, go to the Errors tab to review the error description . Refer to the Combo Edit Rules Quick Reference Guide (opens in new window) for more information regarding valid chartfield combinations.
- When the errors are corrected, click the Save button .
- Re-run the Edit Journal process by repeating steps 1-2.
- When the Edit Process is successful and there are no errors, Journal Status is set to V (Valid), and the journal can now be submitted for approval .
Note, If the processing end date has already passed, the journal status will display the Error Invalid RAS Project-Fund-Activity Period. Instead of continuing to submit the journal, use the Notify button at the bottom of the screen to request the department approver to review and approve the journal in the draft (unsubmitted) form.
How to Submit a Financial Journal for Approval and Monitor Approval Status
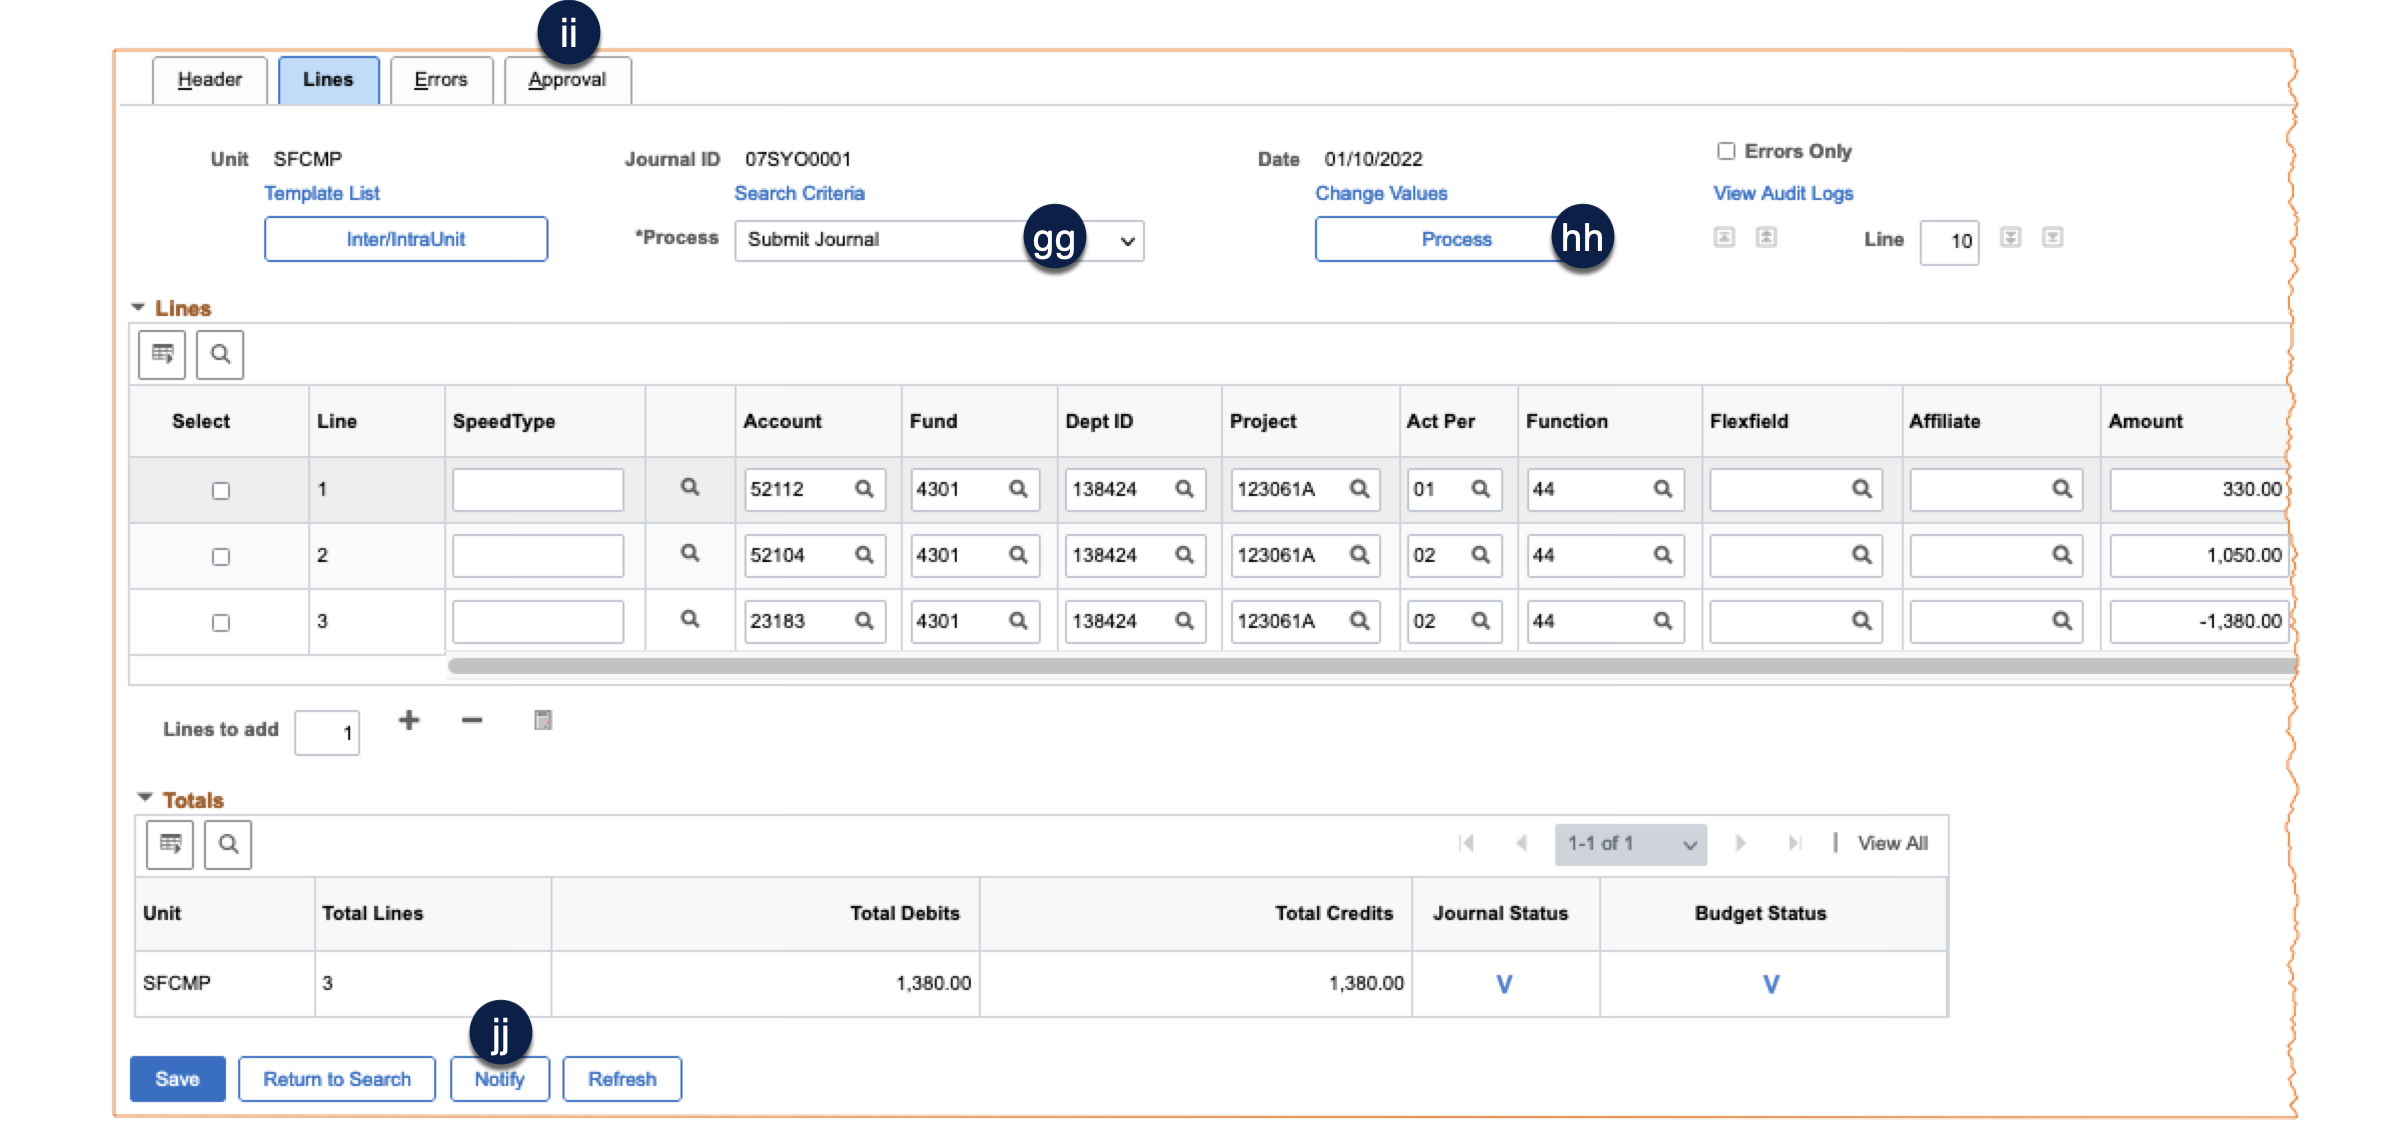
- Change the Process drop-down menu to Submit Journal .
- Click the Process button .
- Click the Approval tab to view the Approval Status and list of approvers . The journal will be in the first approver’s Worklist until action is taken.
- Click the Notify button at the bottom of the page if you wish to notify the Approver via email .
- Return to the Approval tab at any time in the journal cycle to see the current step of the approval process .
How to Notify Contracts & Grants Accounting (CGA)
To Process the Accrual Journal
- Include the Journal ID in the More Information section of the Final Reporting Certification (within PeopleSoft RAS at Research Administration tile > RAS Menu tile > Department Based Reports > Final Reporting Certification) and submit the completed form. See the Instructions tab for directions on how to complete the rest of the Final Reporting Certification.
- If all information is accurate and the accruals justifications are acceptable, CGA will modify the Processing End Date for 2 days later and notify the department to Submit and approve the journals within 2 business days.
- A CGA Accountant may request additional clarification or information to verify the allowability and reasonableness of the expenses prior to accepting/denying.
To Reverse the Accrual Journal
- Upon receipt of the actual invoice/charge, prepare the invoice/charge for approval following normal procedures.
- Prior to submitting to the central office for processing, submit the approved invoice/charge to [email protected].
- CGA will prepare the reversing journal entry and modify the processing end date to allow the actual invoice/charge to post to the General Ledger.