This step-by-step guide provides instructions for running and working with the General Ledger (GL) Verification tool's reports:
- Approval Status Report
- Verification Status Report
- Approval Matrix Report
What Are the General Ledger Verification Reports and What Can I Learn from Them?
| Report Title | Description | Report Display |
|---|---|---|
| Verification Status Report | Identifies the verification status for individual transactions by transaction type for one or more Dept IDs, along with the corresponding users who verified and approved each transaction in the selected month. | For each individual transaction the report displays:
|
| Approval Status Report | Identifies the approval status of one or more Dept IDs, along with the user who approved the Dept ID in the selected month. Approval is required as a part of GL Verification for each month. | For each Dept ID the report displays:
The report also provides a link to the GL Verification Dashboard from a selected Dept ID. |
| Approval Matrix Report | Identifies the GLV approver(s) assigned to each Dept ID. | Displays Dept IDs in tree format along with department names and assigned approvers. |
Opening the GL Verification Tool Reports
After logging into the GL Verification Tool via MyAccess:
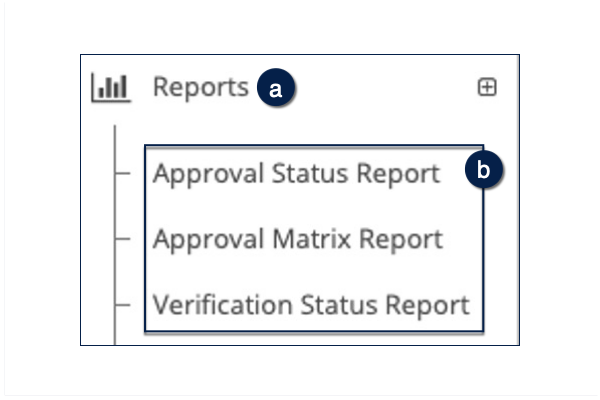
- Click Reports in the left-hand menu navigation .
- Click Approval Status Report, Approval Matrix Report, or Verification Status Report ; the selected report will display in the main window of your web browser.
Tips and Tricks for Working With the GL Verification Reports
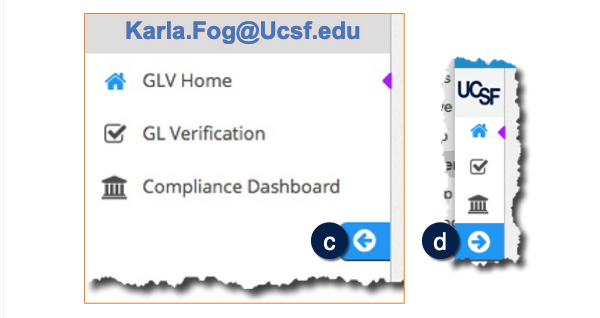
- For the best user experience when viewing any report, click the left-arrow icon to hide the left-hand menu navigation .
- To expand the menu again, click the right-arrow icon .
For more information, visit the General Ledger Verification page on the Controller’s Office website.
Filtering and Running the Verification Status Report
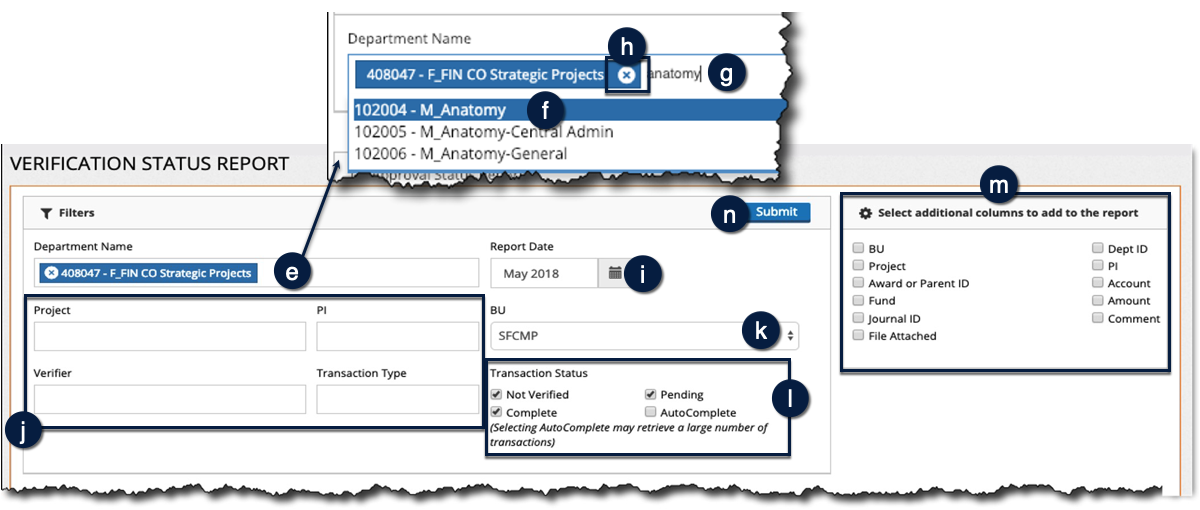
- The Department Name automatically filters the report using your default Dept ID. To add a department, click in the empty space to open a drop-down search menu :
- Click to select any value in the drop-down list .
- Or, search by text or Dept ID number, to make a selection .
- Click the x icon to remove a selection .
- Use the date picker to change the Report Date .
- To display results for a specific Project, PI, Verifier, or Transaction Type, select the desired data from the respective drop-down list. As with Department Name, you may also search to find values .
- Choose the desired Business Unit from the BU drop-down list .
- Check (to include) or uncheck (to exclude) one or more Transaction Status(es) in the report results .
- Check to select additional columns to display in the report view .
- Click Submit to run the report after filtering .
Working with Verification Status Report Results

- Select the number of entries displayed per page .
- Sort on any column by clicking the arrows .
- Clicking any of the additional column checkboxes adds the selection(s) to the report in real time. There is no need to click the submit button to display the selected columns.
- Uncheck selected column(s) to remove them from the report view.
- Click Export to Excel to export the data you are viewing to Microsoft Excel .
- To expand the report to full screen, click the expand icon in the upper right-hand corner. Click the icon again to collapse the screen to the original view .
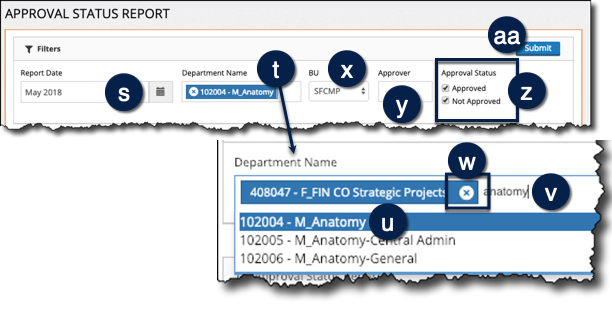
Filtering and Running the Approval Status Report
- Use the date picker to change the Report Date .
- The Department Name automatically filters the report using your default Dept ID. To add a department, click in the empty space to open a drop-down search menu :
- Click to select any value in the drop-down list .
- Or, search by text or Dept ID number, to make a selection .
- Click the x icon to remove a selection .
- Choose the desired Business Unit from the BU drop-down list .
- To display results for a specific Approver, select a name from the Approver drop-down list . As with Department Name, you may also search to find an approver name. Note: The list of approvers available in the filter are those who actually approved one or more Dept IDs in the selected month.
- Use the Approval Status checkboxes to select whether you want to include (checked) or exclude (unchecked) Approved and Not Approved items on the report .
- Click Submit to run the report after filtering .
Working with Approval Status Report Results

- Dept IDs that have subordinates are displayed in grey. Click grey Dept IDs to expand and display their subordinates, indicated in green .
- Dept Name (description) .
- Period (month) the data is from .
- The Dept ID tree Level of the corresponding Dept ID .
- The Verification % is for the given Dept ID .
- Status of the Monthly Trend Report (Complete or Not Verified) .
- GL Verification Approval Status of the Dept ID .
- The Approver for the Dept ID (after the Dept ID is approved) .
- The Approval Date the Dept ID was marked as approved by the Approver .
- Approvers who are assigned to the Dept ID .
- Click a Verification % hyperlink to open the GL Verification Dashboard for the corresponding Dept ID .
- Click Export to Excel to export the data you are viewing to Microsoft Excel .
- To expand the report to full screen, click the expand icon in the upper right-hand corner. Click the icon again to collapse the screen to the original view .
Filtering and Running the Approval Matrix Report

- Use the date picker to change the Report Date .
- The Department Name automatically filters the report using your default Dept ID. To add a department, click in the empty space and begin typing any search term :
- Click to select any value in the drop-down list .
- Click the x icon to remove a selection .
- Click Submit to run the report after filtering .
Working with Approval Matrix Report Results
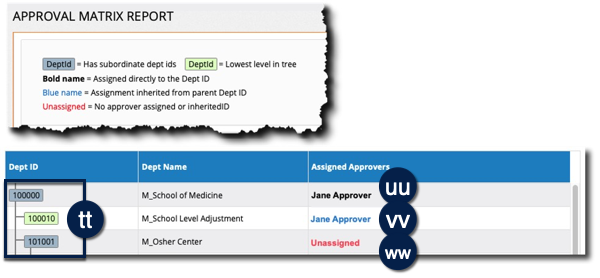
The Approval Matrix Report displays the names of approvers assigned to each Dept ID. It is useful to department managers who need to ensure that all Dept IDs have assigned approvers within GLV. Assignments can be:
- Made directly, as when an approver is assigned to a specific Dept ID in the User Management function, or
- Inherited from parent Dept IDs that have assigned approvers.
- Dept IDs that have subordinates display in grey. Click grey Dept IDs to expand and display their subordinates, indicated in green .
- Bold names indicate an approver was assigned directly to the Dept ID .
- Blue names indicate approver assignment was inherited from the parent Dept ID .
- An indicator of Unassigned means that no approver has been assigned or inherited .
