The Transaction Detail Report (TDR) displays detailed transaction information including Payroll, Accounts Payable, Purchase Orders, Financial Journals, and Budget Journals. This report facilitates research and reconciliation and is used for Step 1 in GL Verification and to review general ledger detail for a set of criteria. This step-by-step guide explains how to filter and run the report.
What Can I Learn from the Transaction Detail Report (TDR)?
- Provides accurate and timely information for researching and sampling transactions.
- Facilitates reconciliation to source documents and/or source systems.
- Allows for drill-through to specific Voucher and Purchase Order source documents when detail columns are displayed.
- Allows for drill-through to ITFS and Network recharge expenses by employee and chartstring.
- Displayed when drilling through for more detail from other reports.
Report Date Filters
Choose the date range using the From and To dropdown menus. The default date range is set to the current open accounting period.

Chartstring Filters
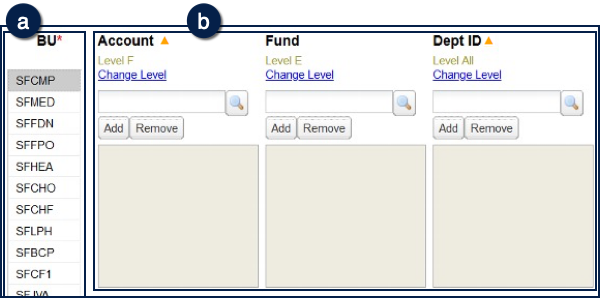
- Select Business Unit (BU), or multiple BUs – this is a required (*) field .
- Enter the Account and/or any other chartfield parameters desired .
- At least one of the conditionally required fields denoted by an orange triangle (▲) must be used.
See the Filtering and Running Reports in MyReports job aid for additional information and tips & tricks for using the filters to configure your report criteria.

Report Specific Filters

You can further refine your search with the following filters:
- Transaction Type – Choose which transaction type(s) to display .
- Choose to display a specific Source Code, Vendor, Journal Preparer, Journal ID, Voucher ID, Invoice Number and/or PO Number .
- Report Sort 1 and Report Sort 2 allow you to apply one or two sort criteria to the report output, and will generate subtotals by sort group .
- Amounts Displayed – Choose which report columns to display in the report output .
- Display Codes and Descriptions – Display Codes Only (default), both Codes and Descriptions, or Descriptions Only .
- Display Columns – Select the columns that should be displayed in the report output .
Report Output Selection

- In addition to the report output selections of On Screen HTML (default), PDF, and Excel , you can choose Unformatted Data .
- The Unformatted Data output returns an Excel file that has no special formatting and a single row for column headings, making it the best source for pivot tables and other advanced spreadsheet analysis.
- Select your desired report output and click the Run Report button .
In both Excel outputs (standard Excel and Unformatted Data), the workbook will contain at least two tabs. The first tab/sheet always displays the entered filter criteria. The second tab/sheet displays the data and differs depending on whether you selected standard Excel or Unformatted Data.
Working in the Report View
- The TDR returns data in list format without subtotals or groupings. However, you may further refine your report using the Sort 1 and Sort 2 options to group and sort records accordingly with a subtotal in each grouping.
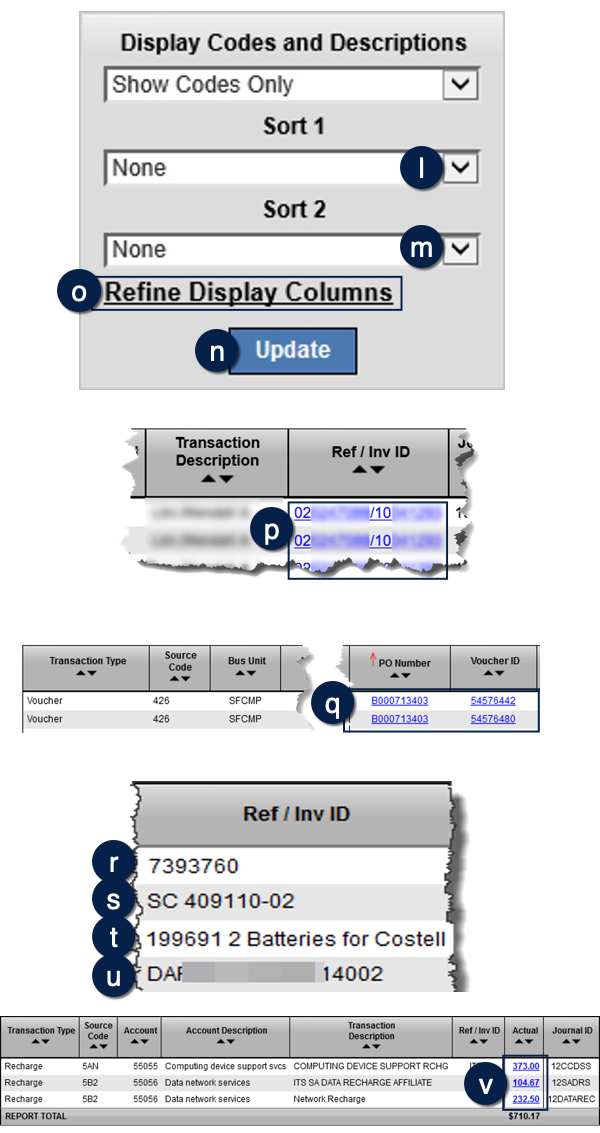
- Click the Sort 1 drop-down and select a value from the list .
- If desired, select the second desired grouping from the Sort 2 drop-down .
- Click Update . Your report is refreshed and now displays data in your chosen groups with subtotals.
- Click the Refine Display Columns link to display the column picklist filter to update the columns that appear in the output . Click Update to refresh the report.
- If an employee’s UCSF and UCPath Employee ID display in the Ref/Inv column, users with access to the HR Data Reports will see a hyperlink that drills to the Employee and Position Roster Report .
- PO Number and Voucher ID columns display in hyperlinks drills to the Accounts Payable/Purchase Order Inquiry Report .
- Information displayed in the Reference column (Ref/Inv ID) differs depending on transaction type:
- Invoice number for general vouchers .
- Subcontract ID for subcontract vouchers .
- Expense report name for MyExpense .
- Cardholder name for PCard .
- ITFS and Network recharge expenses display hyperlinks in the Actual column that drill to the ITS Recharge Detail Report, which provides recharge expenses by employee and chartstring .

Tips and Tricks
- Run a TDR for the narrowest criteria applicable:
- In most cases, running an Operational or Management report first, then drilling on items needing further research will be more efficient.
- If you require detailed transaction information, filter your TDR for the shortest date range and lowest Dept ID and consider limiting the report by Transaction Type when possible.
- By default, the TDR is set to display only Accounts associated with Revenues (4000A), Expenses (5000A), and Other Changes (5700A).
- By default, Account Level F is displayed in the TDR.
- The TDR only displays transactions for the time period selected and does not display information for Period 0 balances.
- The TDR aggregates records with identical transaction attributes into a single row with summarized Actuals, Budgets, and Liens. This reduces the number of similar records that are often seen in postings such as GAEL and suspense journals.
Additional Information and Assistance
- More information about MyReports, including how to request access and additional training, can be found in the MyReports section of the Controller’s Office website.
- If you require help with a technical problem or have a question about a specific report, contact the Controller’s Office Solution Center at [email protected] or 415.476.2126.
- To stay informed about MyReports news, follow the directions on the MyReports section of the Controller’s Office website to join the MyReports ListServ.
