Overview
This guide explains how to transfer Gift & Endowment Income Funds.
Prior to spending, foundation gift and endowment income balances must be transferred from the Foundation Business Unit (SFFDN) to the Campus (SFCMP) or Medical Center (SFMED) Business Units. This document addresses the guidelines and PeopleSoft procedures required to complete a transfer of gift and endowment funds.
Refer to Financial Journals (Source Code 535) for additional instructions on creating financial journals. See Reviewing and Approving or Denying PeopleSoft Journals for additional detail on the journal review and approval process.
Transferring Gift & Endowment Income Funds from SFFDN to SFCMP/SFMED for Spending
To provide transparency in reporting across Business Units, the Foundation shares the same chartfields to track gift and endowment income with the Campus and Medical Center.
- Shared Funds: the same generic Funds are used across all Business Units.
- Shared Projects: Gift and endowment income projects share the same Project number across Business Units; shared Projects replace the previous “mirror fund” convention.
- Transfers from SFFDN to SFCMP/CFMED are done using shared Funds and Parent Projects. Transfers to shared Parent Projects can be further transferred to Child Projects or Subprojects and/or balances can be transferred to different Dept ID’s within SFCMP/SFMED, as needed.
Transfer Methods
There are two methods for making transfers from SFFDN to SFCMP/SFMED:
- For transfers of less than $1.0 million, departments are encouraged to transfer gift and foundation endowment Income from SFFND to SFCMP or SFMED by initiating an Inter Business Unit journal entry.
- Entries will be reviewed after the transfer is complete, but no further review is required by the Foundation prior to posting and completing the transfer.
- Submitting and approving of entries will be presumed to indicate spending for the purpose and approval by the authorized signer. If you are unsure of the purpose of gift or foundation endowment income funds, please contact the Development Office or Gift and Endowment Accounting.
- For transfers from SFFDN to SFCMP/SFMED in excess of $1 million, a workflow request process has been established. Due to Foundation cash and treasury management needs, transfers in excess of $1 million cannot be executed using the Inter Business Unit journal entry. Instead, departments should complete and submit the Transfer of Funds to Regents Request Form.
Transfer Rules
- Transfer Gift (Fund 7000) and Foundation Endowment Income (Fund 7700) balances only.
Endowment (Fund 7500) or FFE (Fund 7510) principal cannot be transferred. - With the exception of Inter Business Unit transfer journal entries, all entries impacting the Foundation ledger are handled centrally by Gift & Endowment Accounting.
- Under NO CIRCUMSTANCES should funds be transferred from SFCMP to SFFDN. If you made a transfer in error, please contact Gift and Endowment Accounting to review options for correcting the error.
How to Prepare an Inter Business Unit Journal Entry Transferring from SFFDN to SFCMP/SFMED
Inter Business Unit journal entries transferring gift or endowment income from SFFDN to SFCMP/SFMED must use specific accounts. Journal preparers need to enter Business Unit, Account and Fund pairings as follows:
Bus Unit | Account - Description | Fund | Debit (Credit) | Source of Funds |
|---|---|---|---|---|
| SFFDN | 54550 - FNDN_C_disbursements to UCSF | 7000/7700 | Debit | Transfer both gift or Foundation endowment income from SFFDN |
| SFCMP | 43501 - Gifts-tof-source-gift | 7000 | Credit | Record gift revenue-source gift-on CMP |
| SFCMP | 43201 - Gifts-tof-source-endow income | 7700 | Credit | Record gift revenue-source Foundation endowment income-on CMP |
During the journal edit process for journals with more than one Business Unit, PeopleSoft will create interunit payable/receivable lines in the journal to balance the entry within Business Units. These lines are created automatically by PeopleSoft and cannot be edited. They are used to settle cash between Business Units. The lines created by PeopleSoft, along with the appropriate debit/credit, are as follows:
Bus Unit | Account/Description | Affiliate | Debit (Credit) |
|---|---|---|---|
| SFFDN | 10000-Interunit payable/receivable | SFCMP/SFMED | Credit (Payable to SFCMP/SFMED) |
| SFCMP | 10000-Interunit payable/receivable | SFFDN | Debit (Receivable from SFFDN) |
Creating an Inter Business Unit Journal Entry in PeopleSoft
- Log into MyAccess (not shown). Scroll down to locate and select PeopleSoft Financials from the application menu. If you have set MyAccess to display "Favorites", you may need to change to "All Apps" or search for PeopleSoft.
- Click on the General Ledger tile, followed by the Create/Update Journal Entries tile.

The Create/Update Journal Entries page displays:

- Enter the correct Business Unit (Defaults to the Business Unit set in your PeopleSoft System Profile).
- Enter a Journal ID using the UCSF preferred “XXABCYYYY” format:
- XX is the fiscal period of the journal
- ABC is your specific 3-character Journal Preparer ID (Check for your Journal Preparer ID on this list, or see Obtaining Your Journal ID if you need one).
- YYYY can be any sequential alphanumeric numbering scheme that is meaningful to you. You may use one or more schemes at your discretion. For instance, you could use letters in the final XXXX section to identify different types of journals in combination with a numbering scheme.
Overwriting the default of NEXT allows you as well as Journal Approvers to more easily locate your journals without the need to recall or record the system-generated ID, because you can easily change the Journal ID search to contains “ABC“ and quickly find any journal you have created.
- Enter the Journal Date (defaults to the current date).
- During the first five (5) business days of a month, (before the previous month closes,) you may enter dates in the previous month. Make sure to allow adequate time for approval, ensuring the journal posts before the month-end close.
- You may enter a date in a future period and save your journal, but you cannot edit or submit the journal until the period opens.
- Click the Add button; The Journal’s Header tab displays.
- Update Long Description

- On the Lines tab, enter the debit to the Foundation Business Unit (SFFDN) and the credit to the Campus or Medical Center Business Unit. Consult the table above for the correct Business Unit, Account, and Fund combinations.( Note the debit to SFFDN and credit to SFCMP Business Units use the same Fund, Dept ID, Project, and Function on both sides of the transaction)
- During the Journal Edit process, the interunit payable/receivable lines are created to balance the journal within Business Units. After editing, the preparer submits the journal for approval.
Approving an Inter Business Unit Journal in PeopleSoft
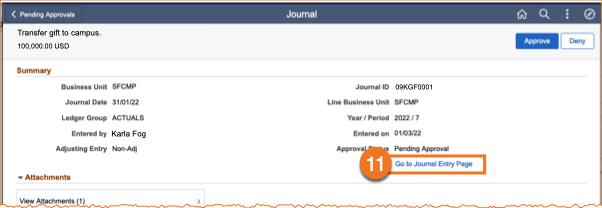
- When Journal Approvers sign in to PeopleSoft and click their Approvals tile, they will see an entry for the Business Unit lines they are authorized to approve. Clicking the entry will access the Journal page.

- Approvers should use the Go to Journal Entry Page link to review the journal in its entirety before approving.
- After reviewing the journal lines, the Journal Approver may approve or deny the journal by clicking the Approval tab.
- The Approval Action drop-down defaults to Approve. If you have completely reviewed all parts of this journal as described in this document and are ready to approve the journal,
- click Submit.

Your approval is immediately updated from Pending to Approved status and will pass automatically to the next Approver in the workflow process if applicable. The journal is also immediately removed from Pending Approvals and the Worklist.
Denying an Inter Business Unit Journal in PeopleSoft
a. To Deny a journal, first change the Approval Action drop-down menu to Deny
b. Deny Comments are required. Enter specific information about why you are denying the journal and how to correct the problem so the Preparer may resubmit a corrected journal.
c. Click Submit.

Your action is immediately updated from Pending to Denied. Any additional workflow is Terminated, and the journal is returned to the Preparer’s Worklist with an email notification. The journal is no longer displayed on the Approver’s Worklist or Pending Approvals.