Overview
GL Verification (GLV) is a UCSF key control per Policy 300-46, with roles: Verifier, Viewer, Approver. This guide covers the Verifier role.
General Ledger Verification (GLV) is a UCSF key internal control required by Campus Administrative Policy 300-46. It is the responsibility of each department to verify that the financial transactions recorded in the general ledger are reasonable and accurately represent Dept ID activity.
The General Ledger (GL) Verification Tool automatically selects items for review and verification based on established business rules. The selected items include high-risk transactions, large dollar value transactions, transactions approved outside the reconciling Dept ID, unusual items, and selected sample transactions.
The system is comprised of 3 roles – Verifier, Viewer, and Approver. This step-by-step guide discusses how to perform your role as a Verifier.
Logging into the GL Verification Tool
- Log into MyAccess, UCSF’s single sign-on platform, using your MyAccess credentials.
- The first time you access the GL Verification Tool you will need to locate it by clicking the Manage Favorites button and then searching for “GL Verification”.
- Click the star icon next to the GL Verification link then click Save Favorites. The GL Verification tool will now be available on your default MyAccess applications list each time you log in.
- Click the GL Verification link to open the GL Verification tool.
Navigating the GL Verification Tool Home Page
The GLV Home page will display. To navigate to the sections of the GL Verification tool:
- Click the GLV Home page link to return to the home page at any time to change the Dept ID, Award, Project or PI you are verifying a.
- Click the GL Verification link to return to the GL Verification dashboard for the selected Dept ID b.
- Click the Compliance Dashboard link to view current GL Verification completion status by Control Point or Level 2 Dept ID c.
- Click User Management to review a roster of GLV users, their roles, and Approvers’ assigned Dept IDs d.
- Click Reports to view GLV reports. See How to Filter, Run, and Review General Ledger (GL) Verification Reports for detailed information e.
- Click the collapse icon to collapse the main menu. Click the expand icon to expand f.
How to Select Transactions for GL Verification
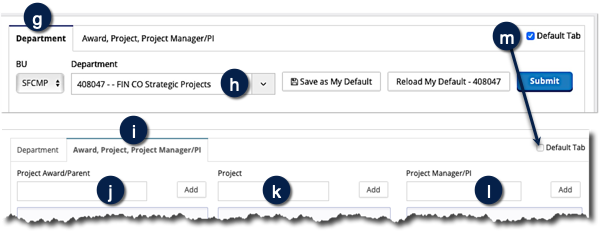
You can specify the transactions that you wish to view or verify using the following parameters from two tabs on the GLV Home page:
- Department tab g:
- Department (Dept ID) h
- Award, Project, Manager/PI tab i:
- Project Award/Parent (Award) j
- Project k
- Project Manager/PI l
- Click the Default Tab box to set one of the two tabs as the default to display each time you log into GLV m.
Selecting Transactions for GL Verification Using the Department Tab
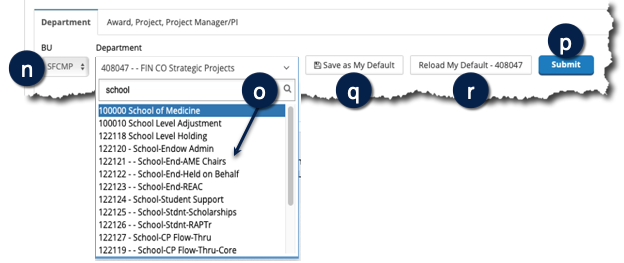
Use the Department tab on the GLV Home page to select an individual Dept ID for verification:
- Select the Business Unit (BU) if necessary n.
- Select a Department from the drop-down menu on the GLV Home page. You can use type-ahead search by entering a Dept ID number or name to narrow the list of choices. Click on the Dept ID you want to select o.
- Click Submit to make your selection and open the GL Verification page p.
If you work in the selected Dept ID frequently, you can click Save as My Default to save this Dept ID for future verification activities q. If you change your Dept ID for another search, just click the Reload My Default button to return to your default Dept ID r.
Selecting Transactions for GL Verification Using the Award, Project, Project Manager/PI Tab
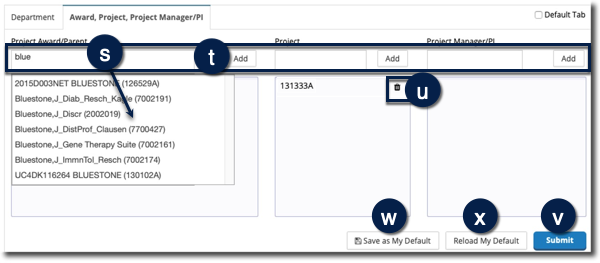
Use the Award, Project, Project Manager/PI tab on the GLV Home page to select transactions related to a specific Project, Award, or Project Manager/PI. You can also combine filters to produce very specific results, but keep in mind the filters are “and” filters, and only transactions matching all entries will be returned in your results.
- Type the name or number of an Award, Project, or Project Manager/PI in the appropriate field. Items that match will display in a drop-down list. Select the one you want or continue to type the full name or number s.
- Click Add to add it to the appropriate filter box. You can add multiple values for each to further refine the data t.
- Click the trash can icon next to a selected item to remove it from the filter box u.
- Click Submit to make your selection and open the GL Verification page v.
If you work in the selected Dept ID frequently, you can click Save as My Default to save this Dept ID for future verification activities w. If you change your Dept ID for another search, just click the Reload My Default button to return to your default Dept ID x.
Navigating the GL Verification Dashboard
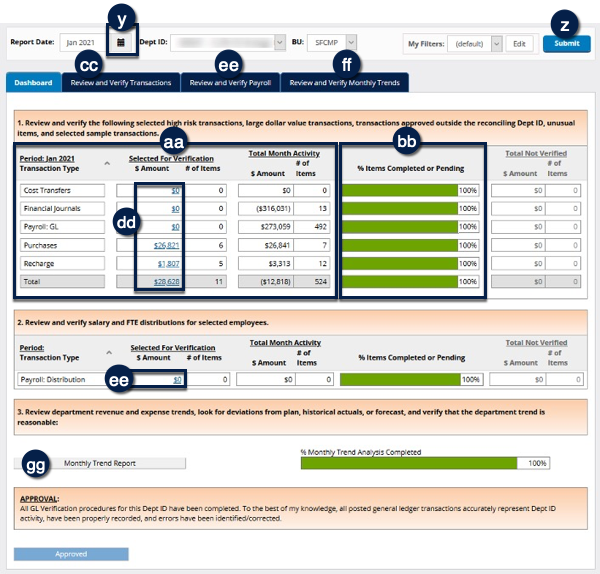
- The report defaults to the last closed month. To see a different month, use the calendar icon next to the Report Date to select the desired month y, then click Submit z.
- Section 1 of the GL Verification Dashboard displays summary totals (by Transaction Type) of the items selected for GL Verification aa. The % Items Completed or Pending section indicates the verification completion percent for each Transaction Type, with green indicating Complete, yellow Pending, and pink Not Verified bb.
- To review and verify the selected transactions, you have three options:
- Click on the Review and Verify Transactions tab to view the entire report for all transaction types cc OR
- Click a blue hyperlinked dollar amount on the Dashboard to open a report for the selected transaction type dd.
- Click the Review and Verify Payroll tab to open a report for payroll transactions only OR click the blue hyperlinked Payroll: Distribution dollar amount in Section 2 ee.
- The second step of the GL Verification process is monthly trend analysis. Monthly trend analysis may be performed by either the Verifier or the Approver, depending on departmental practice. To generate the report:
- Click the Review and Verify Monthly Trends tab ff, OR
- Click the Monthly Trend Report button gg.
- Note the Approve and Submit button is only available to users with the Approver role.
Complete details on performing monthly trend analysis can be found in Performing Monthly Trend Analysis for General Ledger (GL) Verification.
Using My Filters
Use the optional My Filters feature to further refine the Dept ID and to select additional filters for BU, Fund, Dept ID, Project, Activity Pd, Function, Dept Id Site, Project Award/Parent, Project Manager/PI, or Project Use:
- Click Edit from the GL Verification Dashboard; the Build Filter window displays. Select any combination of filters you require hh.
- Select from the filters by typing in the value you wish to find. As you type a list of matching values will display and will be further refined as you type ii.
- Click on the desired value jj.
- Click Add kk.
- To remove a filter that has been added, select the filter and then click the trash can icon displayed next to the selected filter ll.
- To set an added filter to exclude results, click the icon next to the selected filter. The word (Not) will then display next to the selected filter. For example, Function “72 (Not)” would only display transactions that are not related to institutional support & admin mm.
- To review details for any existing filter, hover your mouse over it nn.
- To save filter settings for future use, click Save As and enter a name in the Please name this filter field oo.
- Click OK pp; A confirmation message displays when the filter is saved.
- Click Close (not shown) to dismiss the confirmation message. The GL Verification Dashboard displays.
- Click Submit on the GL Verification Dashboard (not shown) to apply the new filter.
- To switch between saved filters, click the My Filters drop-down menu from the GL Verification Dashboard and select the desired filter qq.
- Click Submit again on the GL Verification Dashboard (not shown) to apply the filter.
Reviewing and Verifying Transactions
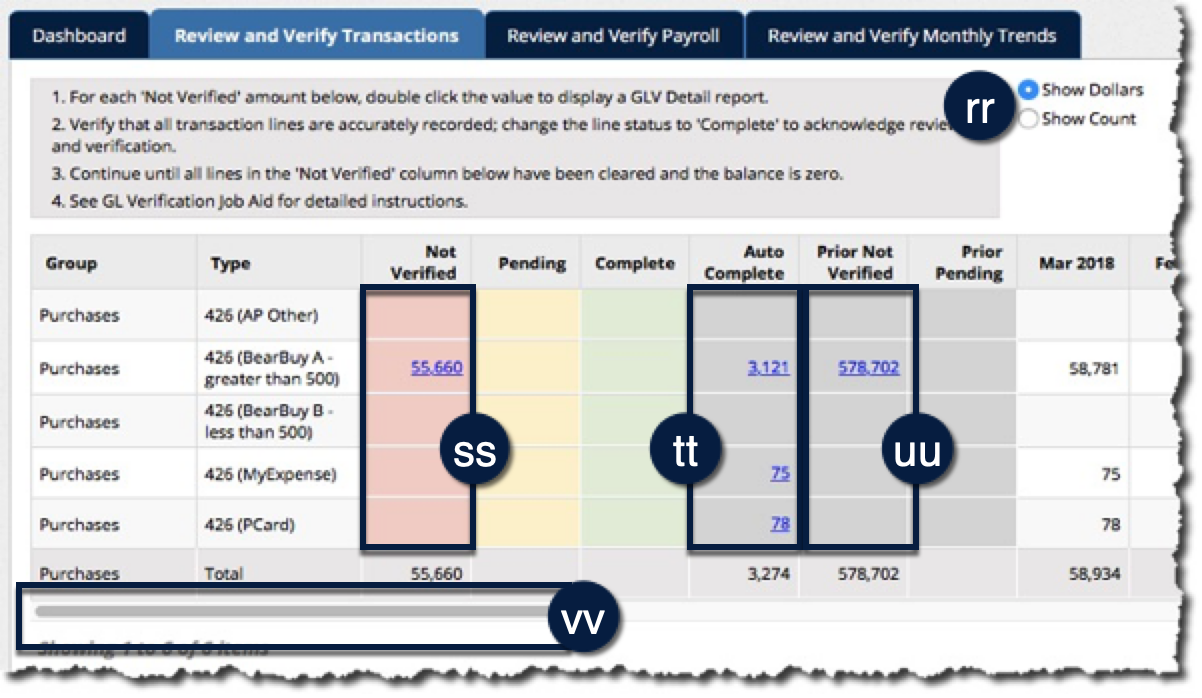
Transaction values can be viewed by Dollars or item Count on the Review and Verify Transactions tab. After choosing the desired view using the radio buttons rr, select the transactions you want to review and verify by clicking a blue hyperlinked value, the Review and Verify Transactions tab, or the View and Verify Payroll tab from the GL Verification Dashboard:
- The values in the Not Verified column represent items that require GL Verification. Items are grouped by Source Code ss.
- Values in the Auto Complete column represent the GL transactions that were not selected for GL Verification. You cannot change the Verification Status of Auto Complete transactions tt.
- Values in the Prior Not Verified column represent the value of items from prior periods that were not verified before the GL Verification period closed. These should be reviewed and verified as soon as possible uu. When you click the blue amount (or item count) in any column, the Verify GLV Items report displays. The report lists each transaction selected for verification. Scroll to the right to see complete details for each journal line.
- Use the scrollbar to see previous months’ GL actuals by Group and Source Code for the last 12 months. You can use this information to review expense trends by category. These amounts are not drillable vv.
- Sort on any column using the up/down icons ww.
- Choose a filter using the drop-down, then enter the desired Input Data. Click the Clear icon to return to all results xx.
- Click Export Data to download the displayed data in an Excel file yy.
Verify that each transaction item was accurately recorded by reviewing all the available data. Then modify the Verification Status:
Verification Status Description Not Verified This journal line is not yet verified. Pending This journal line is pending completion. Complete GL Verification for this journal line is complete.
- Use one of the following methods to set the appropriate status:
- Use the drop-down menu for each Journal line zz, OR
- Use the buttons at the bottom of the Verify GLV Items page to move all items on the current page of the report to the selected status AB.
- To revert to the original statuses, click Reset All AC.
- When finished setting statuses as desired across all pages, click Save AD.
You will be returned to the transaction report in the Review and Verify Transactions tab, where the transactions you just verified are now displayed in the Completed column. Any remaining outstanding transactions stay in the Not Verified column until Completed. Likewise, transactions marked as Pending will be displayed in the Pending column AE.
As transactions are marked Complete or Pending, the Dashboard automatically updates to indicate % Items Completed or Pending. The percentage is based on the number of items, not the dollar amount of items completed AF.
Reviewing and Verifying Payroll
Payroll is reviewed and verified from the Review and Verify Payroll tab:
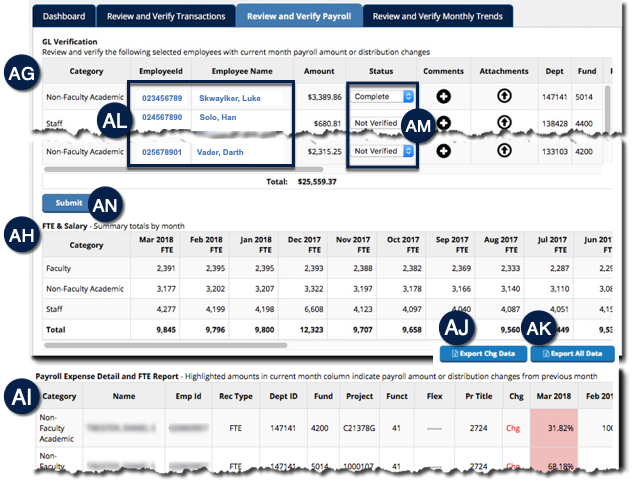
- The GL Verification section lists the employees selected for review and verification AG. A sample of employees paid or with distribution changes in the current month is selected.
- The FTE & Salary section AH displays total monthly FTE and total monthly salary expense for the last 12 months. Use this section to review monthly FTE/salary trends for the selected Dept ID.
- The Payroll Expense Detail and FTE Report section AI displays 3 months of detailed monthly pay and distribution data for each employee. Employees with pay or distribution changes in the current month are noted in the Chg column, with changes highlighted in pink. Use the buttons to export to Excel for changed employees only AJ or all data AK.
- Click on the EmployeeID or Employee Name link to display Payroll Expense Detail for a specific employee AL.
- If payroll detail is correct, scroll to the top of the page and change the employee Status to Complete using the drop-down menu on the line AM.
- Click Submit to save your status changes AN.
- Note: Use the scrollbar at the bottom of the GL Verification section to review additional information about each listed employee.
The FTE & Salary and Payroll Expense Detail and FTE Report sections are provided to assist you in reviewing FTE/salary trends and identifying payroll transactions requiring additional investigation. Only items listed in the GL Verification section of this report must be verified.
Adding Comments or Attachments to Journal and Payroll Lines
Comment and/or attachment use is determined by individual departments. It is the Verifier’s responsibility to understand and follow department procedures for using the comments and attachments features prior to using the GL Verification tool. If you have questions, speak to your manager or supervisor before adding comments or attachments to a journal line.
To add a comment to a journal line:
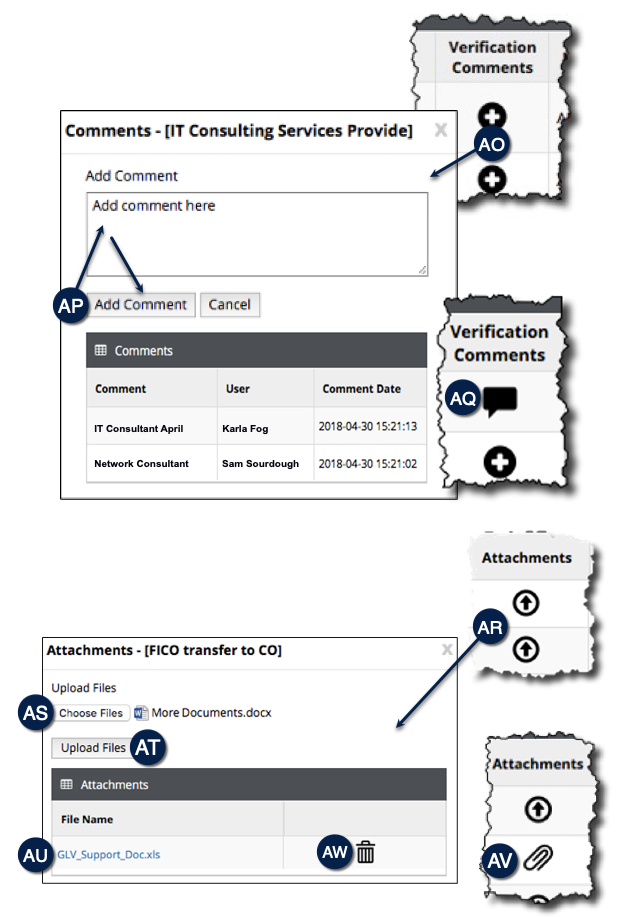
- Scroll to the Verification Comments column (labeled Comments for Payroll verification) and click the plus icon; the Comments pop-up displays .
- Click Add Comment, and then enter your comment in the Add Comment box .
- Click Add Comment a second time to save your comment.
Your comment will immediately be displayed in the Comments box along with prior comments in reverse chronological order. The journal row's Comments icon will change to a black speech bubble to indicate that comments are available .
To add an attachment to a journal line:
- Scroll to the Attachments column and click the up arrow icon; the Attachments pop-up displays .
- Click Choose Files then select the file you want to upload from your computer .
- Click Upload Files .
The file is uploaded to the Attachments list along with any other documents that have been attached. Click a filename to open an attached file .
The row's Attachments icon will change to a paperclip icon indicating files are attached .
Click the trash can icon to delete a file .
Creating an Adjustment to a Transaction
If you have the appropriate authorization within PeopleSoft, you can initiate a 535 Financial Journal or a 545 Cost Transfer journal entry from within GLV:
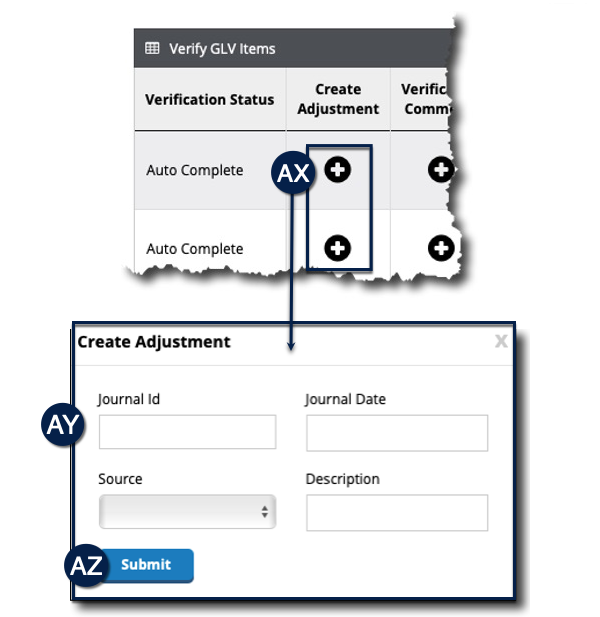
- Click the plus icon on the desired transaction line. The Create Adjustment window displays. Note that the plus icon only appears for transactions that are permitted to be adjusted according to UCSF accounting rules .
- Enter the Journal Id, Journal Date, Source, and Description for the transfer .
- Click Submit . A PeopleSoft window will open that will allow you to complete the transfer.
Remember:
- After you submit the transfer, the journal entry must go through all of the appropriate PeopleSoft approval steps.
- Only one adjustment may be submitted per transaction.
Notifying Your GL Approver
Before you initiate the approval process:
- Return to the Dashboard and ensure all transactions have been reviewed and marked complete.
- Review, verify, and mark complete any remaining Prior Not Verified transactions.
- If you marked any transactions as Pending, be sure to add comments or follow any other specific departmental guidelines so the Approver can determine the best course of action.
When your verification is accurate and complete, follow your established departmental practice to notify your GL Approver and let them know their review and approval are required.


